
| Royal Marines Centaur Mk.IV 95mm CS - Type "C" Hull 1/35 scale by Terry Ashley |
| Royal Marines Centaur Mk.IV 95mm CS - Type "C" Hull 1/35 scale by Terry Ashley |
Lower
Hull:
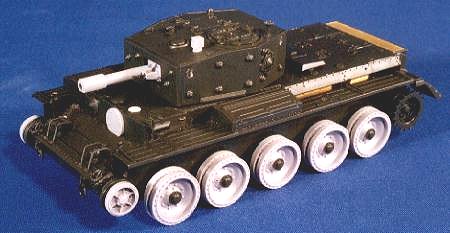
The lower hull was assembled
as per instructions taking carefull note not to use parts C26 & C27 but using
parts A16 (in upper hull). This being the difference in the track tensioning
system and is the main external difference between Cromwells and Centaurs (The
other being the type of engine used)
The Perforated wheels: Firstly drill out the center section of the inside
wheels to take the axle stubbs, I also decided to drill out from the inside
a larger hole to take the ploy caps supplied in the Tamiya kit to allow me to
add and remove the wheels easily. I left the wheels off untill all painting
and weathering was completed. Also add the kit parts A24 to the new wheels.
Replace kit parts A12 (outside idler wheel) with the AA supplied items.
I also added to the rear hull the two supports for towing the Porpoise ammunition
sledge (this was not fitted to all vehicles, but an option) AA parts F,G.
 |
| Click for larger view |
Upper
Hull:
Install parts A16
(as mentioned above). The hull machine gun is deleted on Royal Marine Support
Group (RMSG) Vehicles, replace the kit parts with AA part 'E'. in conjunction
with this is the deletion of the MG periscope, but strangely AA don't give
you
anything to blank this off. I added a plastic card disk to do the job. (Note:
Not all 95mm Centaur's have the MG deleted, most Army vehicles maintain the
MG as per normal gun tanks)
Using the AA brass set I added the side engine intake screens and the rear exhaust
screen, also the mounting brackets for the tow ropes along the right side of
the vehicle. Quite a few other etched parts are supplied which can be used on
other vehicles, sights, Welsh Guards exhaust cowls and fittings for the Normandy
cowl etc.
I replaced a number of rear engine deck and hatch handles with thin wire in
pre-drilled holes for a better appearance. Also added were the electrical leads
for the two small front fender lights. These come out of fittings on top of
the front hull with leads to the lights, again using thin wire. I also added
a number of bold heads on the the rear mud guards from thin sprue.
 |
| Click for larger view |
Painting:
The finished model
was airbrushed using Xtracolor X1 RAF dark green. This is a very close match
for the army dark green when the final coat of matt is applied. It could
possibly
use a bit of lightening, but after final weathering it gives a fairly good
match and has the advantage of being gloss for adding the decals.
 |
| Click for larger view |
The RMSG vehicles
had a distinctive series of degree marking around the turret, these are supplied
on the AA decal sheet. Care should be taken when applying these as they are
very thin and can easily be damaged as they are quite big. I actually cut
the
sections for the front turret sides into two to make application easier. A
good range of vehicle "T" numbers and vehicle names are supplied to make
any number of RMSG vehicles along with the colourful unit markings. A note
here, leave
off the turret bolts with lifting eyes (parts D33) until the decals have been
applied, you will never get the decals on with these parts attached.
Final weathering was done using a wash of black oil paint and a series of drybrushings
with various earth colours to arrive at the desired effect.
The figures are a combination of Verlinden's British Tank Crew and Tank Commander
figures. A number of companies have released Cromwell Crew figures, namely Cromwell
Models, Ultracast, Warriors and Yanks Miniatures. Unfortunatly none of these
arrived in time for this model but I will be using all of them at a later stage
(I may even re-crew this model).
Base:
The base is a simple piece
of chipboard covered with plaster with the addition of basic items to give
a home for the model.
I prefer to display models on a basic base to give perspective to the model
and also so that once the model is finished it doesn't have to be handled. It
looks better than a model sitting on a bare table.
I this means it's then classified as a diorama, well too bad. I build models
for my own satisfaction, not to please some competition judge.
References: