
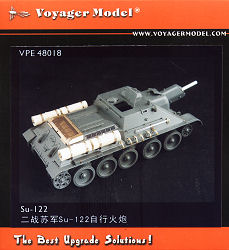
SU-122
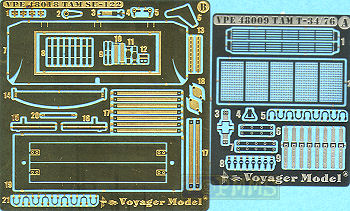
Voyager Models Set#VPE 48018
1:48 Scale
Review by Terry Ashley
 Voyager Models update sets are becoming more and more true multi-media updates
with this set for the SU-122 containing etched parts, resin parts, plastic
rod and a turned aluminium barrel.
Voyager Models update sets are becoming more and more true multi-media updates
with this set for the SU-122 containing etched parts, resin parts, plastic
rod and a turned aluminium barrel.
Designed for the Tamiya 1:48 SU-122 (kit #32527) the set has one fret of etched brass, a smaller fret of etched stainless steel, three short lengths of plastic rod, four resin fuel tanks and the turned aluminium barrel plus a small instruction sheet.
The standard of etching is again excellent with the stainless steel fret being much harder than the softer brass and includes the engine deck screens and other smaller parts. One thing to keep in mind when using the stainless steel parts is you must anneal them by running through a candle flame before trying to bend, especially any curves as the metal is far more “springy” than the brass.
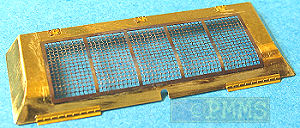
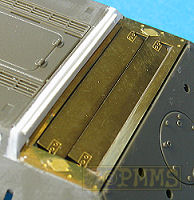
Like most T-34 based update sets you get the main engine deck intake mesh as well as the inner louvers but this set is a little different as you get the full rear curved door as well as the mesh section as etched parts to completely replace the kit part G9.
The door is a little tricky to bend as the rearmost curve does not extend
to the side sections so if using a round rod to bend the upper section you
have to make sure the sides are not curved.
After bending the sides down the upper curve is a little sharp from what it
should be and you may want to solder the resulting rear side join for a stronger
bond as some minor filing is required to blend in the joins.
The mesh section is in the harder stainless steel and you must anneal this before attempting to add the curve otherwise you will have problems and may damage the part. The mesh section has nice mesh detail but the frames are fairly basic without any additional detail definition provided and this fits into a recess provided in the door. Additional small parts are provided for the hinges on either side of the door as this also requires you to remove the moulded on hinge detail from the rear hull panel (part E6).
After bending and assembling the panel door and mesh screen there is unfortunately a major issue in that the door is actually 1mm shorter than the Tamiya kit door (part G9) but the width is okay and you can adjust the angle of the small side door panels to match the width of the kit hull if there are any issues here.

Due to this the curved door panel does not fit neatly to the rear hull panel (part E6) leaving a noticeable gap between the two. This gap is evident in the model photo on the box top so I’m not the first to encounter this.
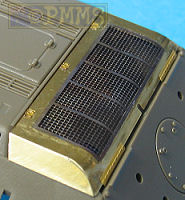
One method to remedy this is to add a 1mm strip of plastic card along the front of the panel recess on the hull, this is not the ideal solution as it does alter the contours between the hull and the intake door slightly but is probable better than the large resulting gap at the back.
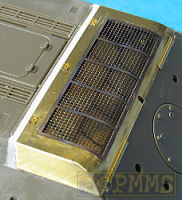
Inside the top door is the louvered panel that fits neatly to the recess on the kit hull and has the two large louvers that you bend to the required angle but you may want to not bend these till ready to add the outer door as bending a few times will see the louvers break off. The fit of the louvered panel is good but remember once this is attached you no longer have access to the screw hole to join the upper and lower hulls and you can join the hulls together before hand or simply glue the hull parts together with cyanoacrylate later.
There is only the two side intake grill panels provided in stainless steel which is good for these fine grills as they have more strength than brass but the fit into the hull openings is not the best and they are a bit loose and tricky to fit. You may want to blank off the insides to hide the see thought look once the grills are attached.
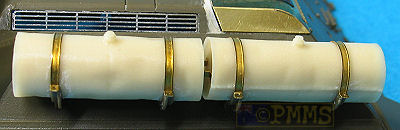
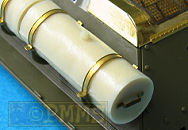
The four side mounted fuel tanks are in cast resin that include simulated denting as well as the filler cap and join weld along the tank. There is a very small pour point lengthwise on the tanks that will need cleaning up and a couple of air holes were present here but these can be positioned against the hull out of sight so are not a problem.
The resin tanks are designed to fit to the kit tanks racks (parts F4, F9) and include etched upper attachment straps and end grab handles. There are a couple of issues here as the resin tanks are slightly longer than the kit tanks and this effects the way they sit in the kit mounting brackets, also the etched straps are about 1mm too long and you will need to trim the inner side to fit and as there is an end attachment that has to be bent 90° this will have to be part of the strap itself after trimming.
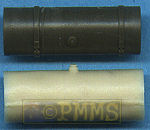
The other major part is the metal 122mm barrel which is nicely turned but doesn’t include any rifling and is a straight replacement for the kit barrel without any alterations needed.

Other smaller detail parts include various tool clips and brackets, the spare track eyelets and straps on the right hull, the bow saw bracket on the left and the brackets and hinges for the fender stowage boxes plus the inner latches and support for the driver’s hatch.
Conclusion:
What is a fairly diverse update set in the box has some parts that simply replace
the kit parts, the barrel and fuel tanks while others require full rebuilds
such as the rear engine bay door and mesh which is unfortunately compromised
by the fit issues.
If you are prepared for a little work this set should be okay and as mentioned you get the fuel tanks and barrel as a bonus over the etched parts.
Recommended.

Thanks to my credit card and Hobby Easy for the review set.
Page created July 8, 2006