

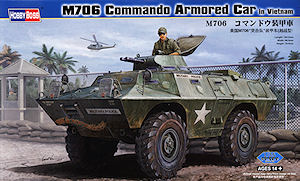
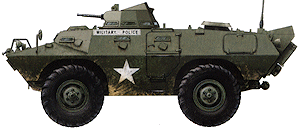
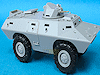
The V-100/M706 was built by Cadillac Gage (now Textron Systems Marine & Land Operations) from 1964 and used widely in Vietnam for reconnaissance, convoy escort and base perimeter defence. It was initially deployed in the U.S. Army and U.S. Air Force as well as ARVN and Thai forces and later used by many other Military and Police organizations around the world.
Some of the users of the V-100/V150 series have included; Bolivia, Botswana, Cameroon, Canada, Guatemala, Haiti, Indonesia, Jamaica, Lebanon, Malaysia, Mexico, Oman, Panama, Philippines, Portugal, Saudi Arabia, Singapore, Somalia, Sudan, Taiwan, Turkey, U.S. Police Forces, Venezuela and West Germany.
The M706 was powered by a 215 hp, 361 cubic inch Chrysler V8 gasoline engine with amphibious capability, 4 wheel drive and run flat tires with a high ground clearance. The standard M706 was fitted with the T-50 turret that could be fitted with 2 x M37 .30 calibre machine guns, 2 x M73 7.62x51mm machine guns and also FN MAGs and M60s. Cadillac Gage also offered a turret featuring a .50 calibre M2 and a single M37, which was also used by the ARVN and some other users.
Hobby Boss have finally released the first in an announced series of Cadillac Gage V-100/V150 series vehicles which have the US Army designation M706 with this first kit representing what could be termed a mid production M706 as it has the raised crew hatches, rounded wheel arches while having the early style driver’s vision posts, flat type fuel filler caps and early exhaust arrangements for a typical vehicle used in Vietnam. But strangely you are only provided with the twin turret mounted M73 7.62mm Machine guns but not the M37 cal.30 machine guns often fitted, especially to ARVN and other user vehicles.
The kit is almost two in one as most of the parts are included for the later M706 Product Improved (kit #82419) and V-150 such as later wheel rims, enlarged V driver’s visor, raised fuel filler caps additional round hatch on the rear deck with 7.62 machine gun and the turret mounted smoke grenades plus the twin 7.62mm M60 MGs fitted to later turrets. None of those parts are used with this kit and all that is really needed for the M706 Product Improved is the modified hull with the rear hatch cut-out which means this kit should not be far behind this one.
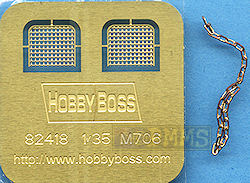
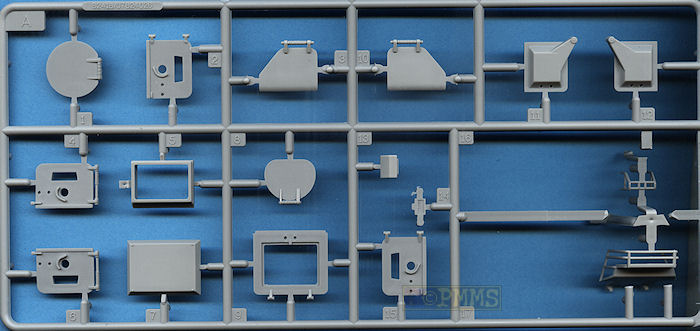
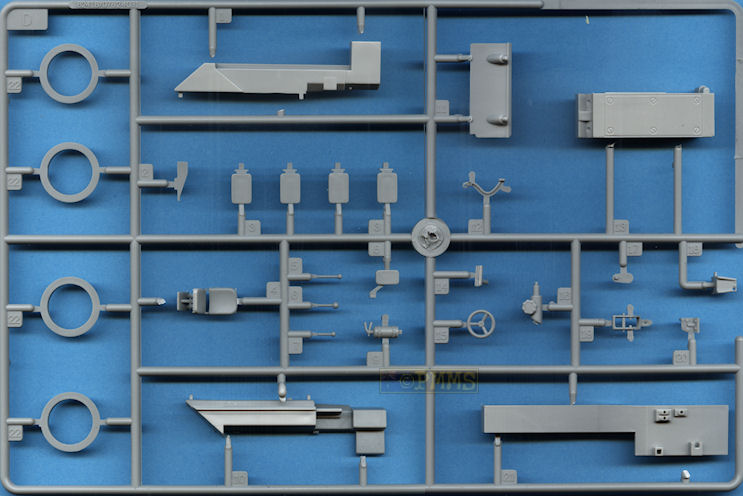
The kit has 234 parts in light grey plastic but 37 are not used for this kit, plus 33 in clear plastic, 2 etched parts, a short length of chain and 8 vinyl tyres along with the decal and instruction sheets.
Dimensionally the kit measures out in all areas extremely well compared to the extrapolated 1:48 plans in the Hunnicut Armored Car book listed below, this includes the hull dimensions, wheels and most importantly the turret in both diameter and height which has been a problem with many of the plastic T-50 turrets provided in previous kits.
Standard of plastic moulding is very good overall with crisply rendered details including subtle weld seams on the hull but there is a little fine flash about the place, mostly in the hull cut-outs that is fairly easy to remove with a #11 blade. There are also some prominent pin marks on the inside of all the hatches as well as the usual moulding seams on the parts to be removed and care is needed with some of the finer parts to avoid damage such as the head light bush guards
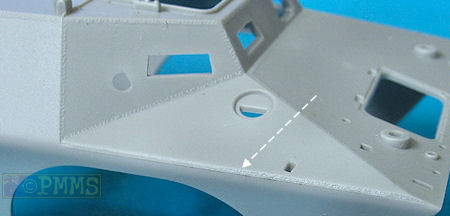
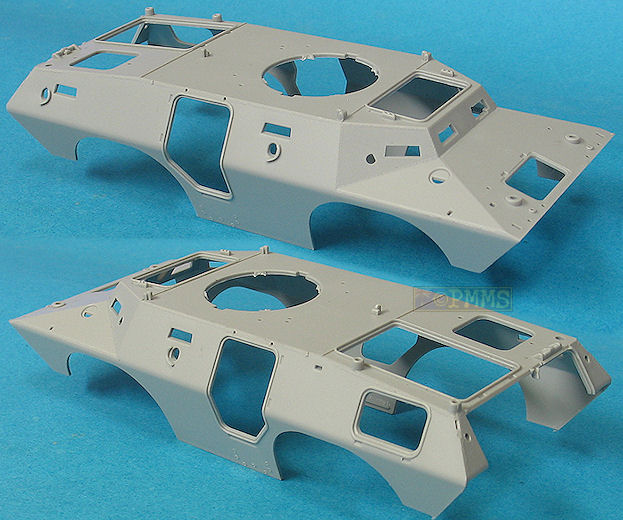
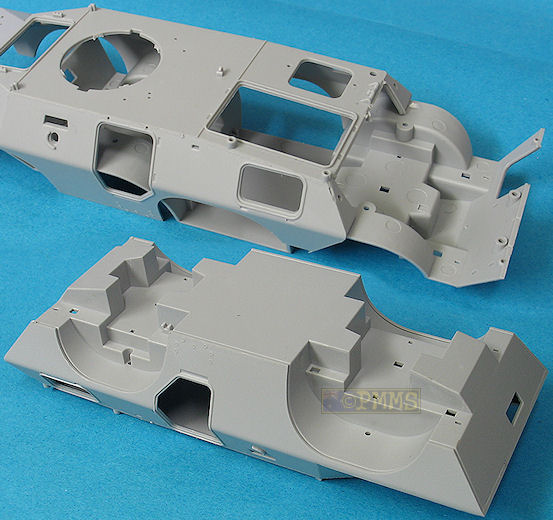
The most notable part of the kit is the design of the upper and lower hull which sees the entire upper hull moulded in one piece that includes the angled sides to eliminate any joins along the hull sides with just the cut-outs for the many separate hatches/doors and is quite an impressive moulding.
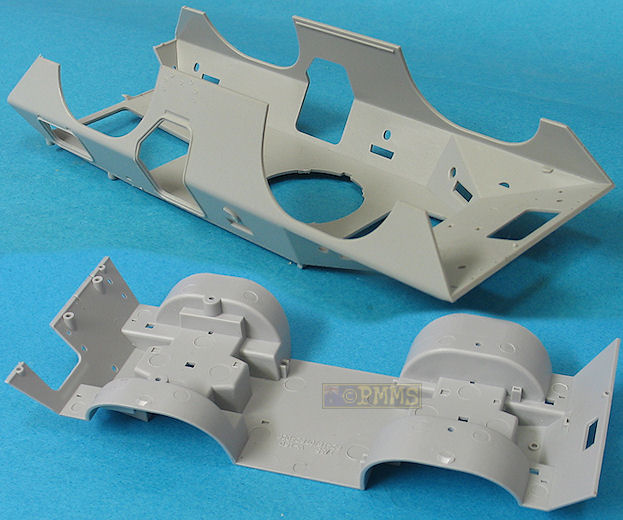
The lower hull pan is also a single piece with the wheel wells and indentations for the suspension and this part slides into the upper hull from the rear to easily slip into place without being hindered by the angled hull sides, a quite novel design that works well. But of course you will need to assembly and paint the interior parts before joining the hull sections together which is done early in the construction sequences.
The kit gives you fairly basic interior with the rear engine compartment, central drive train hump and forward driver’s controls that consist if gear levels that lack the contours of the actual gears, foot pedals with a fairly complicated accelerator assembly that considering can’t be seen afterwards takes quite a bit to fit together as you have to clip the three parts inside each other without breaking anything and most will probably settle for just gluing these together for simplicity. There is a basic instrument panel along with the seat and steering column but the steering wheel is a little undersized and there is the large fire extinguisher as well as 5 basic crew seats around the compartment.
As mentioned you will have to fully paint this before assembling the upper and lower hulls together which has to be dome before fitting the suspension as indicated in the instructions but really the interior is sort of wasted as the hull doors can’t be positioned open without modification as we will come too shortly.
There are some notable omissions for the interior such as the forward winch compartment with just a hole in the front plate for the winch cable allowing you to see inside and you will want to add a plastic card box behind the winch as well the turret basket is not provided but if you have all the hatches closed this won’t be an issue.
Before fitting the hulls part together you have to fit the rear exhaust coaming (part D11) to the lower hull which results is a fairly heavy join seam that has to be eliminated completely as the actual rear hull is a single flat plate.
You fit the upper and lower hulls together by sliding the lower hull pan into the upper hull from the rear, you can do it from the front but it seems to slide easier from the rear but take care no to catch any of the interior parts while sliding the hull parts together.
Once slipped into place there are again quite hefty join seams at the front and rear of the hull which have to completely eliminated as there are no join seams on the actual hull and the fit was good at the front but there was a minimal step at the rear edges that will need a bit of work the deal with. You unfortunately just can’t trim the side hull panels to fit flush with the rear hull plate as that will alter the side profile, but as we are only talking a small amount this may not be that noticeable on the finished model.
At the front the winch opening is just a hole in the hull with a separate part for the cable rollers and the sides of this part are moulded square while they should be rounded and you should either sand these to a round profile or replace with sections off round rod. There is a small section of chain that is slipped into the winch opening but there is no where to actually attach the chain so you will probably just glue this inside the hull which may be a problem once the hull is assembled?
Once all the hull join seams have been seen too the front and rear suspension can be added and these are fairly robust assemblies much like the real things with a large axle and differential assembly with large leaf springs attached to the hull. The springs will need the moulding seams removed but the fit to the hull is very snug with fairly large locating points for the axles and this results in an even sit of the vehicle as well as firm attachments. One thing to watch is the fitting of the shock absorbers as these are trapped between the axles and hull and you have to line these up with the locating holes at the same time as fitting the axles to the leaf springs, a bit of multi-tasking will be needed here.
There are other smaller items added to the undersides such as the front and rear tow shackles as well as the rear towing pintle and pioneer tool rack with the tools moulded without any tie down straps and these could be added from thin tape or paper as takes you fancy.
On the front axle there are steering balls on either end but the wheel hub/brake drums are not designed to be steerable and are just glued into place in the neutral position, almost as if Hobby Boss were going to include steerable wheels but passed at the last minute. It will take a bit of surgery to reposition the wheels if you wanted to add some animation but the ball does give you head start.
Another thing to watch is the front steering rod is slightly too long to fit between the two front wheels and you will have to shorted this a little for the wheels to fit properly but as it is not movable is fairly easy to do.
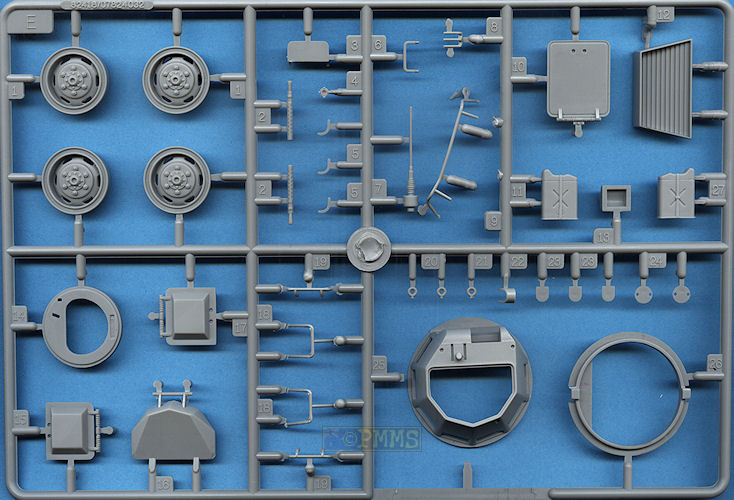
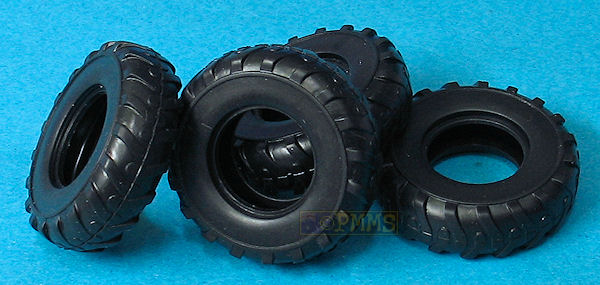
The wheel rims are in two parts each, inside rim and the outer rim/hub with nicely done hub bolts and the six cut-outs around the rim included and these rims/hub match photos of the real wheels very nicely. The kit also includes the later style outer rims for the V-150 but these are not fitted to the M706 in the kit so make sure you use the correct rims for this kit. Just a note, there are not two complete sets of wheels as there are only the four inner rims along the two sets of four outer rims/hubs.
The main wheels are hollow vinyl material with quite nicely done tread pattern but there is also a moulding seam around the middle of the tread pattern which will not be easy to remove but it’s not too prominent so if not accentuated during painting may not be a problem?
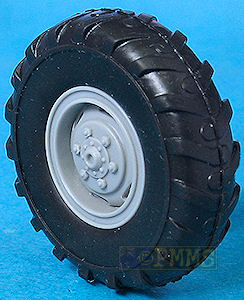
When fitting the tyres to the rims you should ensure the tread pattern is properly orientated for left and right sides which is just a matter the turning them in opposite directions to get the tread chevrons facing forward either side.
The wheels are fitted to the axle brake drums but the front drums are slightly too big and you will have to reduce the diameter of the drums slightly for the wheels to fit snugly and you can leave the wheels off until final assembly for easier handling if you wish.
This is cleanly moulded with the only cleanup needed is fine moulding seams along the forward edges of the hull contours which is easily done with a #11 blade, there is also weld seam included on the moulding but this isn’t on the actual hull and this can be sanded smooth as well.
All the entry doors and various access hatches are separate parts with the two side and rear doors in upper and lower sections as per the originals but it’s not easy to show the doors open as the hull hinges are moulded with the door hinges meaning if you wanted these open you will have to carefully cut away the hull hinge sections from the hatches and attach to the hull with the open doors.
The side and rear two part doors have separate clear vision blocks and separate pistol port covers to give some nice definition to the doors.
Also all the doors have quite large pin marks on the inside as mentioned with no other inside details even if you did modify the hinges so it may be easier all around to glue these closed which means you won’t have to worry about the interior.
The fit of all the hatches is very good with only the top crew hatches needing any trimming so they fit together better and there are additional small grab handles added to the hatches along with the rear exhaust louvers and again the join seam will need to be eliminated around the fairing.
All the side and front vision blocks are in clear plastic that fit into the small openings in the hull and these will have to be painted the appropriate colour as they are not transparent on the real vehicle. The front head lights and rear taillights are also mounded in clear plastic which makes it more difficult to see the details but as you have to paint the entire rear lights with red lenses and “clear” section of the front headlight lights providing these in clear plastic sort of negates the reason for them being in clear plastic anyway?
Other items added to the hull are the lifting eyes front and rear, the flat style fuel filler caps, rear view mirrors in clear plastic plus the pistol port covers also as separate parts and the head light bush guards with fine etched mesh screens added to the guards.
There is also a jerry can with separate handle and filler cap as well as separate rack for the rear hull and the aerial mounting for the right rear corner of the hull which has a short section of the aerial included.
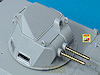
This as mentioned matches the plans in the Hunnicut Armored Car book exactly and has the upper shell with separate lower turret ring, upper hatch and clear plastic vision blocks as well as the top sight and guard and the three small lifting rings. These rings are a little oversized but may be not that noticeable on the finished kit although thinning these slightly will make for a better appearance.
The top hatch again is designed to be fitted in the closed position as the turret mounting posts are moulded with the hatch hinges and if you wanted to show the hatch open the mounting posts will have to be cut from the hinges and added to the rear of the turret. As the posts are undersized in any case just replacing them from plastic card would be the better option but there is not detail other than a couple of pin marks on the inside of the hatch in any case and no turret interior at all.
The armament provided for this kit includes only the smaller M73 7.62mm machine guns with flash suppressors but strangely there are no cal.30 machine guns provided which were fitted to all ARVN and many other user vehicles while the M73s were mostly used by the US Army/AF vehicles in Vietnam.
Some turrets were fitted with one cal.30 and one cal.50 M2 HBMG but again you will have to source this barrel to add if you wanted this configuration.
If you want to fit the cal.30 MGs you can salvage the barrels from any of the kits from the likes of Academy, AFV Club, Dragon, or with any of the available brass cal.30 barrels and to fit these you just need to drill holes through the turret mountings and insert the barrels to the appropriate length.
Another small issue is the MG housings are quite thick and there should actually be the thin outer lip with a gap between this and the gun barrel and drilling out the mountings before fitting the barrels centrally will simulate this feature better.
The turret is attached to the hull in the conventional manner with cut-outs in the hull turret ring and small notches on the bottom of the turret ring with the fit quite snug allowing easy turret rotation.
These are the usual exploded view drawings of the assembly sequences and as the kit is not overly complicated there were no real issues with the assembly. But as usual you should carefully study the sequences before hand to ensure no problems arise.
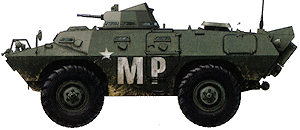
The small decal sheet is well printed with good colour register and carrier film cropped close to the printed images with markings for two US Military Police Vehicles from Vietnam with a colour painting guide with four view illustrations of the two featured vehicles.
Both vehicles have white US stars with the Military Police markings plus the unit markings and some minor stencilling. Despite a large number of quite colourful markings applied to these vehicles in Vietnam you get the same “Blind Faith” vehicle name as included in the old Verlinden resin kit and other decal sheets released for the V-100 in Vietnam. Larry are you reading this?
  Decal sheet 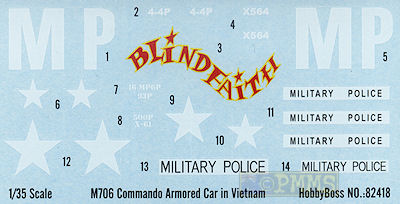 |
Overall this is nicely done kit of the diminutive V-100/M706 with clean crisp detail in the most with well thought out and engineered hull assembly to get the hull side angles but there are some seams to be filled on the hull as a consequence.
The lack of cal.30 machines guns is quite puzzling but these should be readily available given the number of kits that include the cal.30 MGs and there will be a little work to show any of the hatches open, especially the turret hatch to include a crew figure as depicted on the box top.
As mentioned most of the parts for the M706 Product Improved and some for the V-150 are already included in the kit and you could make a later M706 Product Improved but not the V-150 from the parts provided such as the V driver’s visor if you wished.
The kit will build into a nice model of the M706 but some BMS (basic modelling skills) will be needed here and there and it’s good to finally have the kit in plastic with more in the series to come.
Highly recommended 7.5/10
Click on thumbnails for larger view


Detail and comparison images
Close new window to return to review
| Armored Car R.P Hunnicutt ISBN 0-89141-777-X  |
Cadillac Gage V-100 Commando 1960-71 Osprey New Vanguard 52  |
| Cadillac Gage V-100 Commando Squadron Signal Publications Walk Around No.5708 ISBN 978-089747-574-7  |
US Armored Cars in
action |
Thanks to my credit card for the review kit.