
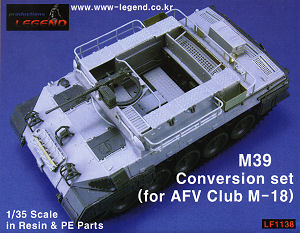
M39 Conversion Set
Legend Productions 1:35 Set #LF1138
For AFV Club M18 kit #AF35015
Review by Terry Ashley

Following the Academy Europe M39 Conversion (kit #35004) which is obviously designed for the Academy M18 which it comes with in the kit we now also have this extensive resin and etched M39 AUV Conversion from Legends Productions that is designed for the AFV Club M18 (kit #AF35015).
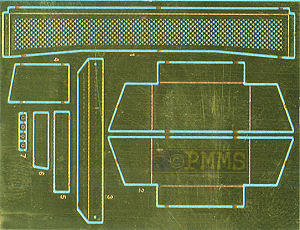
The set consists of 54 parts in light cream resin with numerous small resin rods and bolt heads to be cut off and used as required plus a small etched fret with 11 etched parts plus the all colour instruction sheet.
The standard of resin casting is excellent without any air bubbles or other blemishes apart from a few parts with minor warping which is easy to fix by a dip on hot water plus the usual casting blocks to be removed. These on the upper hull and interior floor are quite substantial and will require a bit of work with the razor saw, especially the floor and also the casting blocks extend onto some parts and you have to carefully cut this away taking care not to damage the part.
The actual resin is typical Legends being fairly soft and not at all brittle which does make the cleanup process easier but take care not to remove too much resin in the process.
The entire upper hull is one large resin casting which is thankfully perfectly square without any warping but you have to cut away the resin film from inside the crew hatch openings and the central compartment and you have to be careful here as it’s a bit confusing exactly how much resin to remove. Legends have included scratch marks on most of the resin to be removed to make this easier but the rear corners will need care to remove just the right amount and checking the instruction images will help.
Detail on the hull is excellent being based on the AFV Club kit which has the details, contours and intake screens that more closely match those of the available plans than the Academy engine deck details. There is nice weld seams added to the hull front and storage locker doors along the sides are well defined with handles added from thin wire provided and there are a couple of smaller details that can be added such as a small rectangular plate on the front of the right superstructure sponson with all the smaller details such as crew hatches, lights and bush guards coming from the AFV Club kit.
There is one issue with the thickness of the AFV Club rear hull plate (kit part B35) which compromises the position of the rear most intake grill and as the resin hull is designed to have the kit rear hull plate glued to the resin hull this issue is perpetuated in the conversion set, more on this shortly.
For the interior there is the large floor plate that includes the bench seats and storage and while the seats have tread plate there is no seat cushions fitted and you may want to add these for an operational vehicle. The mesh grill on the lower sides of the seats is represented which is nice to see but the central drive shaft hump is not included only a square storage box is provided to fit in place of the drive shaft hump which I have not seen in any photos.
The two separate sidewalls have nice details included and these are designed to fit to the sides of the lower floor tub but both were slightly warped and needed a quick dip in hot water to straighten out which was easy enough to do.
The forward left side intake and bulkhead is also a separate part with nice details including the intake louvers and side bolt heads and the internal locker on the right side is another separate part and care is needed removing the casting block as the part is quite fragile.
Other resin parts include the weapons ring mounting designed to have the kit ring added plus the rear compartment panel which has details included on both sides but this too was a little warped and needed a quite hot water bath. All the hull storage racks are in resin which has quite substantial casting blocks to be removed, substantial in that the racks are quite thin in relation to the excess resin to be removed and care is needed not to damage the rod and to end up with perfectly round rods after cleanup.
Also most of the longer rack rods were warped requiring straightening with the racks themselves made up by joining the large curved rack frames together with smaller sections or resin rod cut to length but no indication is given in the instructions of the actual length to cut the rods meaning a process of trial and error will be needed, thankfully you get plenty of rod sections to play with.
Another alternative is to use the resin racks as a guide and make replacement racks from thin wire or solder as these will have perfectly round profiles and will be straight from the start, the choice is basically up to you whichever you find the easiest but making the complete racks will be the most challenging part of the whole conversion.
The remaining resin parts are the spare track carried on the glacis of the M39 plus the small bracket fitted to the nose as well as a couple of nicely cast shovels fitted to the front of the superstructure and a storage box usually carried on the engine deck. You also get two jerry cans cast with the racks and straps in place but with separate handles and these can be used as required.
The etched fret provides the mesh screen the goes along the back of the forward engine deck intake grills between the two sides of the superstructure and this adds nice detail definition to this area plus the two storage bins on the sides of the superstructure. The other etched parts are for the spare track bracket over the resin track on the glacis and a couple of fittings on the rear deck.
The instructions are a single page with a numbered parts layout photo and six photos of the assembled conversion with parts called out by number but there are no step by step assembly instructions and you have to work this out for yourself and as there is some alterations needed to the AFV Club kit parts you will have carefully study the parts and photos carefully before moving on and some additional assembly instructions would have been helpful.
Assembly:
I will go thought the assembly of the major components to show what is required
with the remaining smaller parts easy to add after to finish off the conversion.
Starting with the main hull the rear engine deck is cast quite thick with a large resin block about 3mm thick on the entire underside of the engine deck which isn’t really a problem if you just leave as is but I decided to open up the intake grills for a better look. I used a Dremel tool to grind away the inner resin block to open up the intake grills but remember when using a Dremel or any tool that creates resin dust to wear a good quality face mask and I don’t mean just a cheap paper dust mask from the local hardware shop but a proper mask with filter as the Dremel produces very fine resin dust.
I firstly test fitted the resin hull to the kit lower hull and found a bit of trimming was needed, at the front the top of the kit sponsons had to be thinned to almost nothing at the front to fit properly into the upper hull but other than that the fit was good. You will have to carefully cut away the kit front fenders from the AFV Club upper hull as these need to be added to the resin hull and this will take a bit of work as the front of these actually overlap the hull slightly so some careful cutting is needed.
At the back there was an issue with the rear hull plate from the kit as mentioned above and after initially added the rear plate (kit part #B35) the fit of the resin hull to the lower kit hull was good along the sides but the rear hull did not match up the kit rear hull plate being just over 0.5mm too short, this may not sound a lot but due to the design of the AFV Club rear hull joins this leaves quite a gap. To best fix this I added a shim of plastic card inside the rear hull plate to move this back but this exasperated the thickness of the rear hull plate leaving the rearmost intake grills further away from the rear plate than they already are but it made the rear hull join better with just a small gap to contend with.
This issue is more to do with the design of the AFV Club rear hull join than the resin update but the hull is just over 0.5mm short at the back possibly due to shrinkage with the large casting and may not be the same on other resin hulls in other sets?
One other point I will mention about the kit rear hull plate is the engine access panel (kit part B33) sits proud of the rear hull resulting in a large gap at the top but the panel should actually be flush with the rear hull and some modifications will be required to the AFV Club kit to get this right, of course this has nothing to do with the resin conversion but is something to be attended to with the final model.
Having sorted out the hull fit we can move on to the interior which is all quite straightforward really with just some minor trimming which is normal for any resin set.
Added to the sides of the floor are the sidewalls and these are glued to the sides of the floor plate with the square cut-out on the sides and the floor used to line up the parts. Also note the sides do not butt up against the ends of the cross seats but are located slightly away and I added thin card spacers to make a more secure bond and help keep the walls perfectly upright.
Fitting the left front resin intake (resin part 4) required a bit of trimming so it would miss the front storage box on the floor and I attached the intake to the upper hull test fitting with the floor to ensure all would fit together okay.
On the right sponson is the open storage shelves and this was attached to the sponson after temporarily fitting the floor to get the line-up of the shelves correctly.
The kit engine bulkhead (kit part B26) is used but you need to trim off the locating tabs for the two air cleaners (kit parts C27) as these are not fitted and the layout of the bulkhead details are slightly different for the M39 than they are for the M18 if you wanted to alter these but otherwise leave as is. There was some minor trimming of the back of the resin floor to fit when the bulkhead is in place and test fitting will determine if any is needed.
Before fitting the upper hull in place you should bevel the undersides of the superstructure to match the top of the inner sidewalls or they will not fit properly otherwise and the rear compartment plate (resin part 8) fits from inside the upper hull with no trimming required after straightening the minor warping as mentioned.
The fit of the upper hull to the lower hull with interior added was very good with no further trimming required but of course test fitting often will determine if any is needed but overall the fit is good for a resin to plastic conversion.
At the front the kit crew doors are added to the resin hull but these require a sliver trimmed from the sides of the doors to fit properly but if you cut the kit doors in two and show open then this minor issue is of no concern.
To fit the etched rear screen after carefully bending the thin edges required the ends to be filed at a slight angle to fit between the two sides of the superstructure and again test fitting will determine what if any is needed on your set. The lower edge of the screen doesn’t match the contours of the hull as the sides leaving a small gap either side but there is little you can do about this in any case and the two etched side storage boxes are straight forward and easy to fit to the superstructure sides.
As mentioned assembling the side and rear racks will require a bit of work and these are positioned on the sides and back of the superstructure and if you decide to use wire or solder drilling locating holes in the superstructure will help give a firm attachment for the rack rods.
With the upper weapons ring you will have to trim the lower lip from kit part B13 for this to fit into the resin ring cradle but other than that assembly of the remaining resin and kit parts is fairly straightforward.
Conclusion:
The quality of the resin is first class with just some minor warping to contend
with the fit of the resin to resin and resin to plastic parts very good overall
with just the rear hull issue of any real concern and the addition of the
etched parts adds further details to the kit.
This set will build a very nice M39 with minimal work for a major conversion and provides the conversion for those with the AFV Club kit and not the Academy M18.
Highly recommended


| STUART A History of the American Light Tank R.P.Hunnicutt. Presidio Books ISBN 0-89141-462-2  |
Toadman's Tank Picture
CDs M18 GMC and M39 AUV Walkaround CD |
Modelling US Army
Tank Destroyers of WWII Osprey Modelling No.13 Steve Zaloga  |
| Allied-Axis The Photo Journal of the Second World War No.4 Ampersand Publishing. The publishers of MMIR  |
US Tank Detroyers in action Squadron Signal Publications No.2036 ISBN 0-89747-385-X  |
US Tank Detroyers Walk Around Squadron Signal Publications #5703 ISBN 0-89747-456-2  |
| M18 GMC Hellcat Museum Ordnance Special Number 17 Darlington Productions, Inc.  |
M18 Hellcat Tank Destroyer 1943-97 New Vanguard No 97 Osprey Publishing  |
US Tank Destroyers of WWII photo CD Enygma Graphics  |
Thanks to Legends Productions for the review set.
Page created January 14, 2007