

With the recent second re-release by Tamiya of the venerable Sd.Kfz.222 Leichter Panzerspähwagen 4x4 (kit #35286,) Lion Roar have released this extensive update set in there Super Details series to give the kit a real makeover.
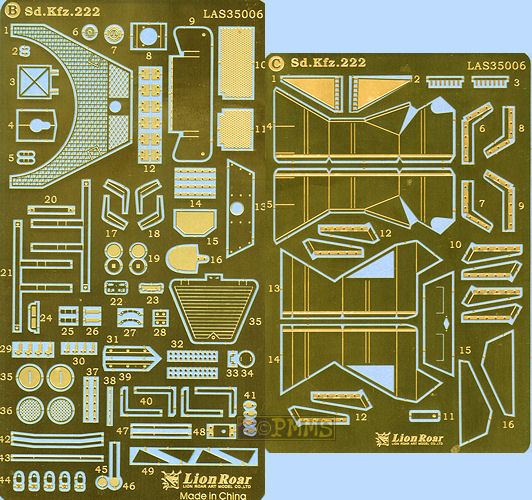
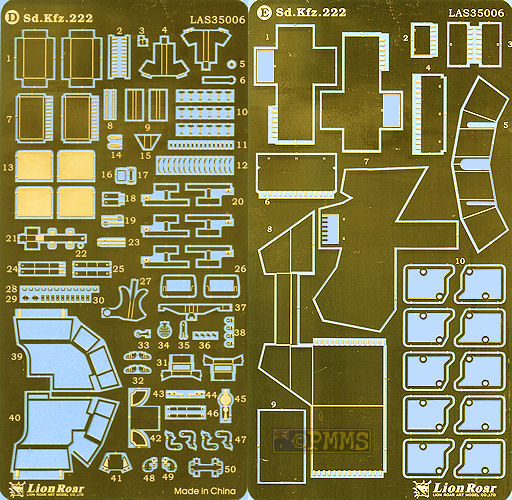
The Update Set:The set consists of 8 frets of etched parts plus a turned brass KwK38 barrel and brass fender width indicators and a length of 1mm and 2mm brass rod but there is no resin as with other super sets and the frets are of different thicknesses to better portray the parts included such as the turret shell in thicker metal while the top screens are quite thin.

Quality of the etching is again first class with clean crisp details and the usual bending lines required but you need to take care as many of the parts has very thin hinge segments to be carefully formed around the wire provided which allows just about every storage box door to be made workable if you wish. Other parts requiring careful bending in opposite directions on some boxes and for the thin frames on the turret screens and the use of a dedicated etched bending tool would be advisable.
I have used many of the available tools extensively over the last few years and have found the ones I resort to most often are the original Etch Mate (#EM-001), the newer Armour Extra Details EASYbend and for the really small jobs the 2” Hold and Fold “Bug”.
Many of the etched parts provided replace kit parts completely and there is actually very little surgery needed on the kit, with the major jobs being cutting all the clips from the tools, removing the equipment box and jerry can brackets and the fender locating lugs as well as cutting out the rear engine compartment panel and some of the smaller parts from the 20mm gun and it’s best to trim all these before you start adding the etched parts.
The lower chassis is detailed with new bumper bar supports and tow hooks as well as the front and rear armour panels along with some smaller brackets with the large storage boxes on the left hull side completely replaced with etched parts.
The larger box will require some careful bending as some sections require you to bend the segments in opposite directions so work out what is the best sequence for these before starting and the top and lower front doors can be made workable with full width hinges that again require careful bending with the wire provided used for the hinge pins. It is best to solder these boxes together for greater strength and soldering from the inside will reduce the amount of cleanup required.
All the door latches and padlocks are supplied as small etched parts that can be added and the two lower lockers also have the doors hinged with additional latches and padlocks for excellent detail definition. Even if you do not make the hinges workable still bending the hinges around the wire pins and fitting the doors closed will result in excellent detail definition.
On the hull all four fenders are replaced with etched parts and again there is some careful bending required with the storage compartments on the front fenders again having workable hinges provided.
You have to be careful bending the outer lips of the fenders as these are rounded curves and the fenders have a wide bend line on the underside and bending this around a drill bit for example first will give you the rounded edge required.
Added to the front fenders are the brass width indicators, and multi-part turn indicators as well as the pennant support plus the mud guards and underside support brackets that give added strength to the hull join just like the real brackets.
The rear fenders again have the underside supports and mudflaps as well as the taillight mounting bracket and light face to add to the kit part while other hull details include all the visor rain guards in three parts each that will require careful fitting plus all the tool brackets as mentioned that include the front smoke grenade brackets, the jerry can racks other smaller brackets.
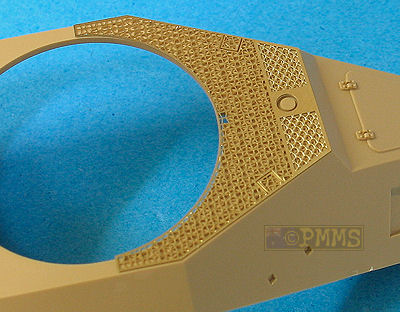
At the back is the louvered panel with the louvers having gaps between them allowing these to be slightly bent to shape and the fine screen on the top of the hull behind the turret is in one large piece with extremely finely etched screen mesh. This new mesh is designed to go over the top of the existing engraved detail on the kit which gives it a little more depth and it’s up to you if you want to cut away the moulded on screen first but this would entail blanking off the resulting hole to stop the see through look and it may be better to just add the etched screen as designed.
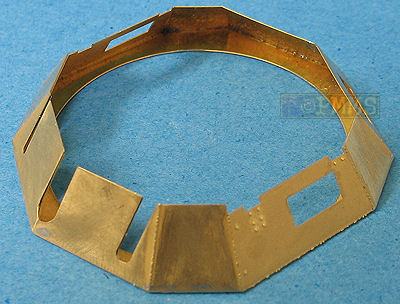
The turret is next and this sees the entire turret shell replaced with thicker etched metal and this has very good surface details including some of the better etched welds seams you will see and again it’s best to solder the turret sides once bent to shape for greater strength as the last thing you want is this coming apart after you have added the top screens which can happen quite easily if just using cyanoacrylate (super glue) on such a large assembly.
There is one issue here where the assembled turret sides are flush with the hull sides but the actual turret sits just over 1mm in from the hull edge in 1:35 scale, this is confirmed by photographs of the 222 turret/hull and the 1:35 plans in the Panzer Tracts No.13 Panzerspaehwagen “Armored Cars Sd.Kfz.3 to Sd.Kfz.263” book.
Added to the turret are the upper screen latches and the kit visors are detailed with inner brackets and opening hinges allowing you to fit these open or closed as required using the wire provided to form the hinges.
The top screens have the frame separate and these require extremely careful bending as the frames themselves are quite narrow and it is easy to distort these while bending if not held tightly in the bending tool. Once bent to shape the separate fine mesh is added and this does make the assemblies more robust but they are quite fragile and you should handle these with care during assembly with the small latches allowing them to open or close as required.
One thing to note with the turret shell is there are four small brackets attached to the turret base when on the fret but the instructions show these removed which I duly did, but in fact these are the attachments to secure the turret to the hull so leave them attached as you remove the turret from the fret.
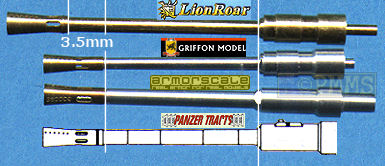
The KwK38 gun gets a new brass barrel which has the flash suppressor very well done with cleanly opened up holes in the suppressor and neck but unfortunately the barrel is about 3.5mm too long for the KwK38 barrel. This is confirmed comparing it to known data and the excellent 1:35 plans in the Panzer Tracts No.13 Panzerspaehwagen “Armored Cars Sd.Kfz.3 to Sd.Kfz.263” book which has 4 view 1:35 plans of the Sd.Kfz.222 and side 1:35 view of the Sd.Kfz.234/1, both of which are armed with the KwK38 cannon.
Both the KwK38 barrel from armorscale (#B35048) and Griffon Models (#LB35006) are the correct length as can be seen from the comparison image below. It is possible to modify the Lion Roar barrel by shortening the barrel by the required 3.5mm as the other details are very sell done.armorscaleand Griffon Models barrels which are the correct length
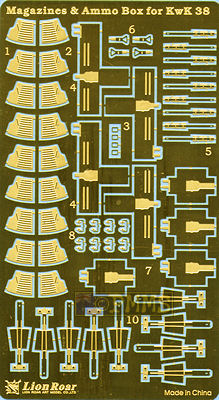
Other details added to the gun are the small front shield, various brackets on the gun mounting that require some kit parts to be cut off before hand but nothing excessive and you are also provided with 9 x 10 round 20mm magazines and 4 magazine boxes with these assembling in the same manner as those for the FlaK38 in set #LAM040 and add nice detail to the gun assembly as well as using the additional magazines and ammo boxes as required.
Conclusion:
Overall this is an extensive update set for the Tamiya Sd.Kfz.222 that will add many of the finer refinements to really enhance the kit. As mentioned most simply replace the kit parts leaving little surgery but some of the etched assemblies will require care and some experience working with etched parts and soldering would be of assistance.
The extra length of the KwK38 barrel is a little off putting but it’s not that hard to rectify resulting in a nicely detail gun along with etched magazines and ammo boxes.
Recommended for those wanting to really dress up their 222s. 7/10
Etched and other parts
Click on thumbnails for larger view

Close new window to return to review
 |
Toadman's Sd.Kfz.222 Photo Detail CD Detailed photo walk around on the Sd.Kfz.222 |
 |
Sd.Kfz.222 & 223 Soft cover Currently out of print but excellent reference if you can find a copy. |
 |
Panzerspähwagen Uwe Feist and Robert Johnson Hard Cover |
 |
German Light Reconnaissance Vehicles Soft cover |
 |
Panzer Tracts No.13 |
Thanks to my Credit Card and ![]() for
the review set.
for
the review set.