

Instruction sheet historical notes by Mike Sills
The resin parts backdate the Tamiya kit No.35300 to the initial production version of the A12 that served with the British Expeditionary Force. At that time the tank was officially known as the Infantry Tank Mk II. It was renamed the Matilda Mk.I when nomenclature was revised in 1941.
7th Battalion of the Royal Tank Regiment had 23 of the new tanks in France in 1940. The co-axial Vickers .303 machine gun required a bulky mantlet casting to accommodate the water cooling jacket. An outlet for venting steam from the gun projected from the upper right side of the turret roof. The engines were AEC diesels of 87 bhp. The exhaust of the left engine exited the top of the rear deck, while that of the right engine went out the hull bottom. Sometimes referred to as "one up, one down", this arrangement has led to the misconception that they had only a single exhaust pipe.
Of note was the very high standard of finish of these early vehicles. Flush fasteners and countersunk screws were used to attach the fenders and side plates, resulting in a smooth appearance. The side plates were chamfered where they met the bottom of the mud chutes. The hinged fitting for the aerial of a No. 11 wireless set was mounted on the rear of the turret, although none were equipped with a set. Only the left headlight was fitted. Concern over ground clearance led to jacking up the tanks by lowering the suspension six inches leaving the bogies exposed. All of 7 RTRs tanks are thought to have been fitted with a tail skid attachment intended to assist in trench-crossing. This was a post production fitting that also incorporated the silencers and exhaust outlets.
Six additional A12s were in reserve with 1st Army Tank Brigade. These did not have the tail skid. Some of them are reported to have seen action with 1st Armoured Division, but in any event all 29 A12s deployed to France were lost.
Joe from Tiger Model Designs (TMD) has announced the company as we know it will cease to exist on March 31 this year, but he has indicated all the proposed Matilda update and conversion sets mastered by Mike Sills will be released as scheduled.
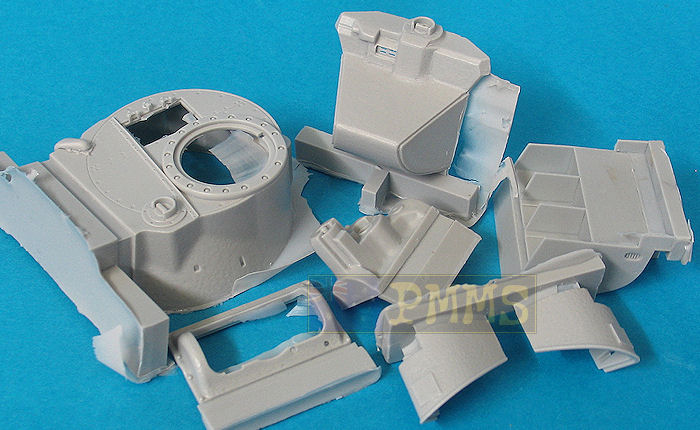
As mentioned in the introduction this conversion set backdates the Tamiya Matilda Mk.III/IV (kit #35300) to the initial BEF version with the set consisting of 39 parts in light grey resin, 1 in clear resin plus a metal 2pdr barrel tube with the muzzle flare. Also included is a 6 page letter sized instruction sheet with the construction notes and historical data.

Close new window to return to review
The quality of the resin casting is simply first class with clean crisp castings and the only blemishes being a small hole in the lower lip of the turret front plate and another air hole which did not break the surface. So unless you go poking about with a sharp stick this shouldn’t be a problem, you may wish to fill this from behind to prevent it appearing after painting for any reason? The other small hole is easily filled before you begin.
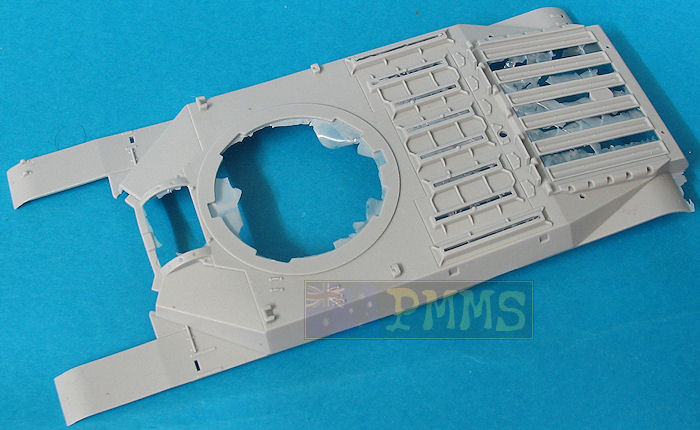
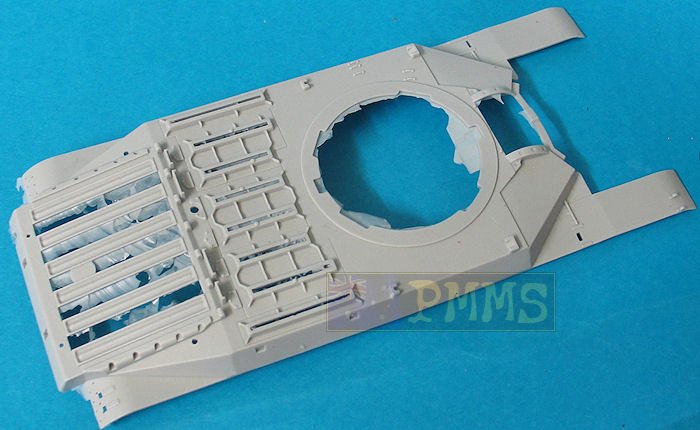
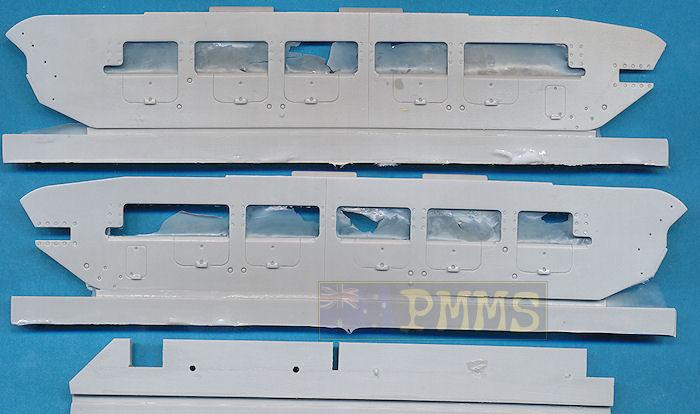
The only cleanup required is the usual casting plugs and a fair bit of fine resin film that comes away from the parts very easily with a sharp #11 blade. Some minor warping is present on the long thin side armour panels and on the thin mudguards that extend out the front of the large upper hull casting, the remainder of this casting is perfectly square and blemish free apart from the extensive resin film in engine deck openings as mentioned.
The warping on the front fenders might look like a problem at first glance but isn’t at all, on my set the thin fenders pulled down straight for a perfect fit to the kit inside fender supports and outer resin armour panels so don’t spend time unnecessarily trying the straighten these out before assembly. The side armour panels also mostly pulled into line when attached to the kit mountings so test this first to determine in any warm water treatment is required.
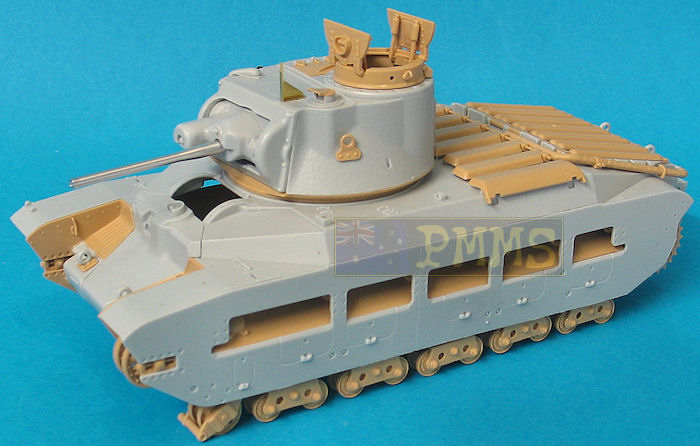
The conversion set gives you everything you need to backdate the Tamiya kit with a complete new upper hull casting with the revised BEF hull features, most notably the up and down exhaust arrangement, elimination of the all the hull rivets and different tool storage.
The early nose casting has excellent cast texture and is without the added armour block under the driver’s vision port as well as two squared plates added to the front, the kit compartment doors (parts C11, C12) are fitted to the resin nose and this required the only real trimming in the set, more on that below. At the back is the large tail skid fitted to the early Matildas.
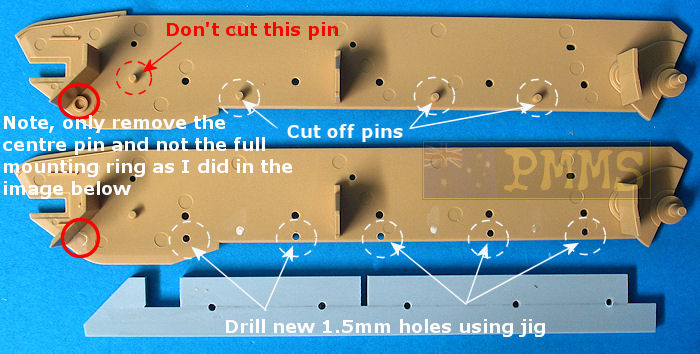
The inner suspension bogie parts are included to allow you to lower the suspension by way of the large jig provided to drill the new holes, very nice idea that works well. Both the side armour panels are also provided as mentioned to again reflect the earlier detail from the later kit parts as well as the new exhaust pipes required.
The complete early style turret is provided which incorporates the Vickers steam outlet as well as the deletion on the dome ventilator on the roof, the large cast mantlet is included along with new turret front plate plus the metal 2pdr barrel.
No markings are supplied in the kit so these would have to be sourced elsewhere.
The instructions have photos of the kit parts as well as photos of key areas during construction as well as detailed assembly notes that are easy to follow but as usual you should test fit parts before gluing.
There is also a listing of all BEF Matildas of the 7RTR giving serial and registration numbers along with the applicable vehicle names which should come in very handy when deciding on a particular vehicle to build,
While the kit may look like it’s for the advanced modeller the fit of the parts, especially resin to plastic was so good it’s just like assembling a ‘normal’ kit apart from cleaning up the resin parts before you begin.
There are some alterations required to fit the lowered suspension parts that again shouldn’t pose any great problems, the instructions have photos and text to help describe the process quite clearly so long as you follow the steps everything should proceed smoothly.
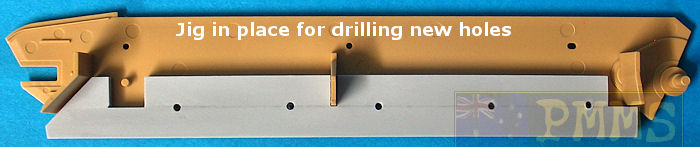
Basically you cut off three of the kit suspension locating pins and using the resin jig provided redrill the holes for the lowered suspension. Note these are quite close to the lower edge of the kit hull side panels so make sure you firmly hold the jig into position. I would advise not to drill all the way though with the jig in place, just make a mark with the drill tip for the 5 holes, remove the jig and complete drilling the holes. This will allow you to check they are in line which may be hidden if the jig is still in place.
The jig supplied makes drilling the new holes quite easy.
From there you just assembly the suspension as per the Tamiya kit instructions substituting the inner resin bogie parts for the plastic kit parts as described in the assembly notes, all quite straightforward really.
Included in the conversion is an extra four track links to extend the kit track for the lowered suspension but I would recommend the use of the excellent Bronco Models ‘Matilda 2 Infantry Tank "Flat" Type Workable Track Link Set’ (kit #AB3532) which has enough links to cover the extra four links required as a replacement for the kit track.
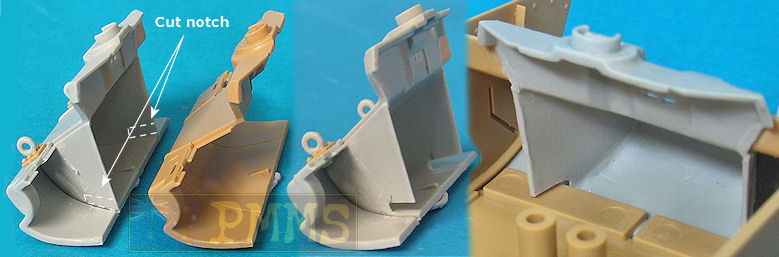
There were two small issues fitting the new resin nose, at the junction of the glacis and driver’s plate there is a small notch extending out slightly but the line should be straight without the notch for the compartment doors (parts C11, C12) to fit. That sounds a little confusing so I have added images to illustrate the small alterations required.
The second is the back of the nose casting has solid side panels while the kit nose is hollow at the back, this requires you to cut small indentations for the nose to clear the lower hull nose mounting bracket. The resin side panels are fairly thin so cutting the small indentations is quite easy, test fit before gluing.
Adding the rear skid is again fairly straightforward, just leave off the kit exhaust but still glue the mounting brackets (parts A24) and then add the large skid casting to the rear hull. You may need the trim the kit parts A24 slightly for a good fit but test fitting will determine this.
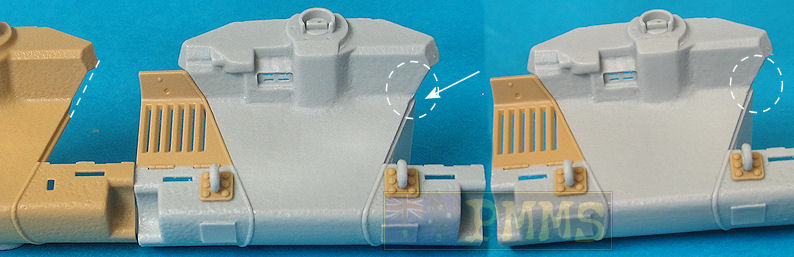
The exhaust pipes use the upper kit left side pipe (part D79) to which is added a new resin lower pipe section leading into the side of the skid. The underside right exhaust pipe requires you to remove a few bolt heads and drill a locating hole for the new resin pipe which again joins to the side of the skid assembly, all straightforward.
The remainder of the hull parts, the tools and front and rear lifting hooks are again straightforward to add as are the replacement armoured side panels that fit exactly the same as the kit side panels so no further alterations are required other than checking for any minor warping as mentioned above. The resin upper hull itself also fits to the lower hull the same as the original kit hull; you fit the two poly caps and retaining ring (part C1) inside the resin hull as you would with the kit hull.
The new resin turret uses the kit parts for the lower turret ring and top loader’s hatch and Commander’s cupola with these fitting perfectly to the resin parts without the need for any trimming. Fitting the resin mantlet and turret front plate is again straightforward but note the mantlet has to be glued in place as it doesn’t include the attachment pins of the kit mantlet that allow elevation, so make sure you have your desired gun elevation as you glue the parts together.
The metal barrel has the flared muzzle profile which is correct for the early BEF Matildas and has the bore drilled out slightly but you may want to drill this out deeper for a better appearance?
This is a superb conversion kit to backdate the Tamiya Matilda kit to the earlier BEF version which has top shelf resin casting, excellent fit of the parts both resin to resin and resin to plastic with only minor alterations required to the base kit to fit the replacement parts.
If you are at all interested in this excellent series of Matilda updates/conversions it would be advisable to get in early before the end of TMD company setup to ensure you are “in the queue” (sorry Joe to cause you more work).
Very Highly Recommended
Also see the full build blog on Track Link by Patrick Bernier


Close new window to return to review
ISBN/EAN: 9788372192677 |
Matilda ISBN/EAN: 9788372192912 |
 Matilda Infantry Tank 1938-45 Matilda Infantry Tank 1938-45by David Fletcher New Vanguard 8 Osprey Publishing ISBN: 1 85532 457 1 |
 Matilda
Thanks to Joe of Tiger Model Designs for the review kit