

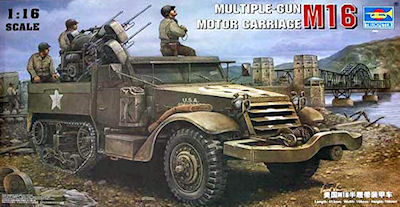
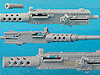
The details on the M2 cal.50s is very well done with the receivers and cooling jackets split in two halves with excellent crisp details and separate ammo feed chute covers, after joining the halves together there is just small seams to be eliminated. There is also some fine mould seams on the cooling jackets that are easy to remove with separate barrels that have the bore hole included.
You are provided with alternate barrels with and without the barrel changing handles but wartime photos of the M16 shows they do not have the handles fitted, you can remove the handles and use these barrels for internal storage as mentioned previously.
There are also the rear firing handles included but again wartime photos and the manual show these were not fitted to the cal.50s on the M16.
You should take care when looking at photos of restored M16s in museums as some of these use any cal.50 they can get their hands on and some have the barrel changing and rear firing handles fitted but this is not authentic for wartime M16s.
The cocking handle and brackets is also separate for good detail and you should take care as the guns are reversed for the left and right side of the mountings with the cocking handles facing outward on both sides. While the gun detail is good overall the upper foresight is moulded solid and you should drill this out and add the sight pin for a better appearance in this scale.
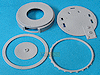
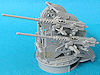
The Maxson mounting pedestal is in five parts, the lower pedestal, two bolted rings and the upper mounting floor/base turntable which is held in place with a small securing ring screwed to the turntable allowing this to rotate freely. The lower pedestal has two openings in the sides but these are usually closed and you may want to blank these off but the openings are not that noticeable on the assembled pedestal mounting.
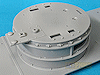
Added to the turntable is a 9 part auxiliary motor which has quite nicely done details but you will have to drill out the small locating hole for the exhaust pipe in the side of the cylinder cooling fins for this to fit. The 6 part battery is added next to the motor but this has very basic details which really needed enhancing and you may want to add the additional wiring for the motor and battery to finish of these assemblies.
The gunner’s seat joins to the forward footrest but you have trap the gunner’s control stick between the two seat parts at this stage as it won’t fit later and this means the control stick flops about loose until you add the mounting sides later so take care. There is also a large join seam between the two seat parts that is a little tricky due to the control stick getting in the way. Don’t worry about the pin marks and open front of the control stick as these are all hidden once the gun shield is added later.
The two large side mountings have quite a few pin marks on the insides both on the lower frames and on the large circular face and the outer revolving gun mounting plates are designed to be held in place with a screw that is right in the middle of the mounting and quite frankly is quite ugly.
Thankfully the screw is not really needed to hold the two mounting parts together and a little work will give a much better result. Firstly fill the large central hole with a plastic card disc and fill the small hole in the middle of the outer mounting with a 0.7mm plastic rod plug, this hole is there because the screw actually comes out this side of the mounting adding to the ugliness of these screws.
On the inside of the outer mounting is the large pin that fits through the middle of the main mounting into which you are supposed to screw the screw into, just shorten this pin by the thickness of the plastic card you used to fill the central hole.
Once you have filled the screw holes you just fit the two mounting halves together as designed but without the screw with the fit being quite snug but still allowing the outer mounting to rotate and once you add the sight crossbar (part Y3) between the two outer mountings they will stay in place even when rotated. The gun sight itself is made up of two plastic parts, one clear and one etched part but there are prominent mould seams that need to be removed from the sight before fitting. The sight is offset slightly to the right and not mounted centrally which is correctly depicted on the part but make sure you fit the sight post the right way around to reflect this, one end of the post has a small lug tp help ensure you get this right but take care in any case.
The two outer gun mountings have excellent details including the lower elevation teeth with the gun mounting posts fitting snugly into place but watch the part numbers to ensure you get the right mounting post in the right place to avoid any problems later. The two large posts have sizable extensions that fit into the bottom of the ammo chests making for a robust mounting for the chests that also allow these to be added at any time to make things easier. There are small gun mountings added to the posts and just watch the direction of these as its easy to put them the wrong way around causing problems when adding the guns later.
The ammo chests used here again are split vertically resulting in prominent join seams that have to be removed with care due to the raised outer lip and again using a sliver of plastic card to cover these may be the best options.
To fit the guns to the mountings you will have to cut away two rivets from the lower front edge of the receiver to fit into the mounting properly but other than that the guns fit into place okay although the rear mounting is a little vague due to the gun just sitting on top of the mounting bracket without any rear joining point, but the forward mounting is quite snug with makes up for this if secured firmly.
Fitting the assembled gun mountings to the turntable is quite straightforward as there are two large tabs on the bottom that fit into holes in the turntable for a robust fit, you have to locate the mounting pins for the gunner’s control column, the rear seat support and the sight cross bar as you fit the to mounting halves to the turntable but this is really not a problem as all fit into place easily without any problems.
There are two small inner supports added to the sides and the large front armoured shield is designed to clip over two locating lugs on the forward edge of the mounting which it does quiet easily resulting in a very snug and robust shield attachment.
The shield itself has the correct lower fillet detail with nicely done weld seam added with the only issue being the thickness of the top shield extensions and you may want to thin these a little for a better appearance.
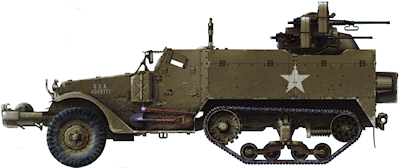
Added to the back of the mounting is the loader’s platform which identifies the mounting as the M45D variant and this too fits into place without any problems between the side arms attached to the gun mountings and the assembled mounting fits snugly to the lower pedestal base on the inner floor added earlier in the construction.
Overall the Maxson mounting is very well done with the only issues being the many pin marks on the inner faces and those horrendous screws which can be eliminated with some added work but the final appearance is well worth the effort. There is also the join seams on the ammo chests that could have been avoided if Trumpeter used the same design as for the storage chests and adding additional details to the motor and battery will also improve the final appearance.
|