


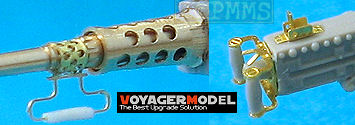
Muzzle bore hole and close up of cooling jacket
Note; rough recess not indented correctly under close examination
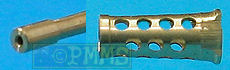
The turned brass barrel has a drilled out muzzle with the correct size bore hole and has the subtle taper of the barrel with the cooling jacket as another machined brass part with the cooling holes as well as the machined recesses either side of the jacket. The machining of the recesses is a little rough and you may want to smooth these out a little and also the recesses should be just that, recessed into the cooling jacket but are level with the jacket surface but this may not be that noticeable on the assembled gun.
The cooling holes are cleaning drilled without any excess brass to remove but the jacket appears oversized and the fit of the cooling jacket to the barrel is a little loose at the front and at the back there is nothing to ensure the barrel is central to the cooling jacket as you fit to the target gun and care is needed with this.
and will need care to align correctly to the receiver.
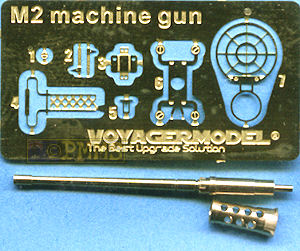
The standard of etching is excellent as you would expect from Voyager but the small fine parts do require careful handling during assembly.
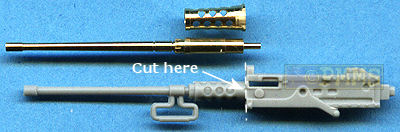
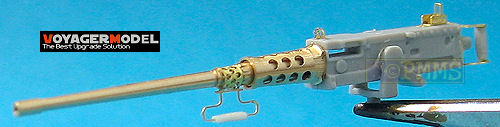
For this exercise I have fitted the barrel to the Hobby Boss cal.50 MG from their M4 HST kits to add those finer details.
To fit the barrel, simply cut off the Hobby Boss cooling jacket and barrel, drill a small 1mm hole in the front of the receiver for the pin on the barrel and glue in place. A couple of things to watch is the front of the cooling jacket is a little loose around the barrel and you should ensure the barrel is mounted centrally but any small gap can be filled with cyanoacrylate as you attach the jacket. At the back there is nothing to hold the barrel centrally in the cooling jacket and after adding the barrel you should ensure the jacket is glued evenly over the barrel.
If you want to get really picky the front lip of the jacket is a little large and is slightly too far forward in relation to the barrel retaining ring part way down the barrel as mentioned but these are only very minor issues and along with the cooling jacket side recesses may not be really be noticeable but are things to take into consideration accuracy wise.
The instructions show to use small lengths of plastic rod for the two hand grips but cutting the handles from the kit parts will look better as they have to curved profile of the handles that plain rod lacks.
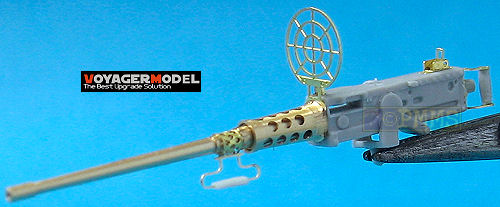
The upper rear sight is straightforward to fit but the foresight is very small and fiddley requiring careful bending to get a good finish and thankfully Voyager give you two parts in case of disaster.
Adding the barrel changing handle will again require careful bending to form around the barrel but the changing handle has the usual etched metal issue of being flat two dimensional instead to three dimensional especially with the lower handle grip.
There is a simple remedy for this and that is to take a section of 1mm plastic rod and with a sharp blade slice this half long ways, you can then glue each half to the etched handle to give it a proper 3D appearance.
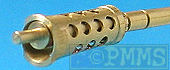
Note; small gaps around the front jacket/barrel join.
Assembled barrel and receiver with additional etched parts.
This is another excellent metal M2 Cal.50 barrel with well executed details on the barrel and cooling jacket with only minor detail discrepancies on the jacket recesses and barrel that may not be that noticeable on the assembled barrel but are there.
The additional etched parts allow you to fully detail up your Cal.50 for an even better appearance and the AA sight is a nice bonus.
Assembly is fairly quick and easy but you need to take a bit of care with the loose fitting cooling jacket but this shouldn't pose any real problems.
Highly recommended 7.5/10
See a comparison of the available M2 Cal.50 metal barrels
Thanks to Voyager Models for the review set.