
"Latest
Despatch"
Diorama by Terry Ashley
1/35th Scale
 The M247 SGT. YORK DIVAD
(Division Air Defence gun) was born of the U.S. ARMY'S need for a state-of-the-art
mobile Anti-Aircraft gun system to re-place the ageing M163 20mm Vulcan A/A gun
and M48 Chaparral missile systems.
The M247 SGT. YORK DIVAD
(Division Air Defence gun) was born of the U.S. ARMY'S need for a state-of-the-art
mobile Anti-Aircraft gun system to re-place the ageing M163 20mm Vulcan A/A gun
and M48 Chaparral missile systems.
With the large heavily armed and armoured Mi-24 Hinds of the Soviet Army now being
fitted with the longer range AT-6 SPIRAL Anti-tank missiles and twin barrelled
23mm cannon. plus the newer Mi-28 Havoc nearing deployment, it was obvious the
M163 and M48 systems would be totally out-classed in any future major powers conflict,
not to mention a large amount of envy as the ARMY chiefs eyed the Soviet ZSU-23/4
SHILKA Quad 23mm A/A gun which combines a valve-technology radar with a proven
gun fitted to an existing chassis resulting in a highly successful and lethal
design.
With this in mind a requirement was issued for a new self-propelled Anti-Aircraft
gun system to be based on the M48A5 tank chassis, using as much off-the-shelf
equipment as possible.
Two designs were submitted, one from General Dynamics using twin 35mm Oerlikon
cannon (as with the West German Leopard) and the other from Ford Aerospace and
Communications Corporation which utilised twin 40mm L/70 Bofors Guns.
In May 1981 the Ford Aerospace entry was selected and designated M247 SARGEANT
YORK, featuring the twin 40mm guns mounted in a new box like armoured turret with
both tracking and surveillance radar fitted atop, these could be folded down to
reduce overall height. The gunner was also provided with roof mounted sight incorporating
a laser range-finder. the commander having a panoramic roof mounted periscope
and fixed periscopes. The radar was a modified version of the Westinghouse APG-66
system used in the F-16 Fighting Falcon.
With the first production vehicles being delivered in late 1983 many teething
problems had still to be ironed out. The most serious of these being the radar's
inability to track low flying targets due to excessive ground clutter (it could
not distinguish between a hovering helicopter and a clump of trees) also when
tracking higher flying targets the radar return from the gun barrel tips themselves
was enough to totally confuse the fire control system, the turret traverse was
also too slow to track a fast crossing target. The ECM (electronic counter-measures)
suite could be defeated by only minor jamming and finally the use of a 30 year
old hull design meant the vehicle had trouble keeping pace with the newer M1 Abrams
and M2/3 Bradley's, the very vehicles it was designed to protect.
These problems proved insurmountable and in December 1986 after about 50 vehicles
had been produced and 51 Billion spent the entire program was terminated, the
existing vehicles being either used for training or converted back to gun tanks.
The
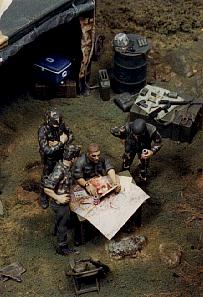
DIORAMA
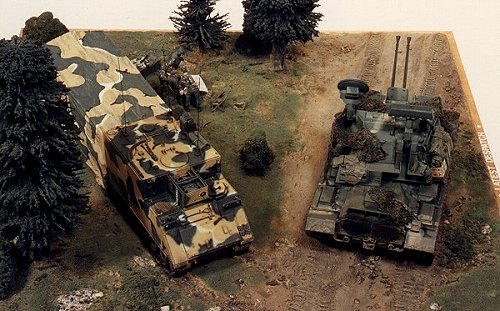
Had the SGT. YORK been successful
this scene could well have been played out many times. On a training exercise
somewhere in Germany the 'troops' have taken a break from the action for some
light refreshment and to check out the 'Latest Despatch' to arrive from HQ.
Click for larger view
The
M247 SGT. YORK (Tamiya
Kit 35126)
Tamiya have produced this
kit in the same way as the real vehicle, by taking the hull from their M48A3
(Kit 35120) and adding a new turret and tracks (the new T142 patten tracks
have
been provided and could be used if building a M60A3). The M48A5 is essentially
an A3 with new engine/ transmission and 105mm gun added.
The Kit will build into an excellent model straight from the box, but with a
little extra detailing a very realistic vehicle will result.
The Kit is built following the instructions with firstly. the headlight guards
(parts C46,47) being thinned down for a more realistic appearance and the fender
storage box handles replaced with thin wire, this is very useful for grab. handles
and other small fittings as it can be easily bent to shape and attached in pre-drilled
holes with super glue. The tow cables have been replaced with fishing tracer
wire after firstly running it through a candle name to remove the springiness
and attaching to the ends from the kit cables (parts C88).
Clear perspex lenses have been added for the driver's periscopes, which is made
easier as the kit comes with holes already cut, as if Tamiya were going to provide
these but over-looked them. The auxiliary motor exhaust (part C10) has been
drilled out, as has the 40mm and M60 gun barrels. A set of small numbered drills
and pin-vice are indispensable tools when detailing any type of model.
Finally the upper and lower hull parts are joined and the seam along the nose
eliminated by filling and sanding. Tamiya Putty is excellent. being quick drying
with little or no shrinkage and is very easily sanded.
Click for larger view
The turret has four small
brackets added along the front from shaped plastic card plus two additional
eye-lets on the roof (only two being pro-vided in the kit. parts C36), the
rest
is as per instructions. with very little filling needed.
Next comes the painting and weathering, a good paint job can enhance a model
while a super detailed model can be spoilt by a poor finish.
The MERDC Tropics camouflage scheme was airbrushed with the black brush painted,
there are many variations in the application of this scheme with some being
totally sprayed while others are brush painted. A complete article could be
written on the MERDC system but basically it is 12 standard colours used in
various combinations for different locations from the Artic to the tropics,
deserts, winter and summer climates with the same pattern on each vehicle type
changing only with the colours used.
The markings are Verlinden and Let-raset rub on letters, eliminating the problem
of decal carrier film spoiling the finish. The cam nets, bedrolls and tarps
are soaked in white glue and draped over the vehicle to get a natural sit (white
glue is any woodworking glue, 'Selleys Aquadhere' etc. diluted with water to
a milky consistency). Tissue for bedrolls. tarps and Verlinden cam netting is
soaked in this solution which dries hard and can be painted in the usual manner.
The ration cartons are also Verlinden items with other gear from various kits.
one thing when attaching storage to a vehicle is to ask, how is it held in place?
Boxes and rolls just stuck on, look just that - stuck on! Remember those straps
and tie downs. this small point can improve the final appearance of your model
out of sight. The tracks are painted and weathered before fitting to the model
and before weathering a coat of matt varnish is air-brushed overall and left
to dry for at least 48 hours, this protects the paintwork k during the weathering
process.
A black wash (a mixture of flat black paint and thinner at about 20/80 ratio)
is applied with a fine brush to highlight the detail, capillary action carries
the. wash along panel lines and around the raised details. Mud and dirt is applied
to the lower parts of the model (one way of simulating mud is to mix small quantities
of 'Poly-filla' to the appropriate colour paint, the resulting gooey mess is
then applied with a flat brush). Finally the model is drybrushed with various
lighter shades of colour to highlight the raised details.
The
M577 ARMOURED COMMAND VEHICLE
(Tamiya Kit 35071)
This vehicle is a derivative
of the basic M113 APC with a raised rear section to accommodate additional
seating, map tables and radio equip ment for the command role with a generator
fitted
above the engine compartment to power all this extra equipment when the main
engine is shut down. First produced in 1962 the M577 and later M577A1's are
still the standard command vehicle in the U.S. Armoured and Mechanised units
today as well as many other army's around the world (Australia included) and
probably will be well into the future.
To provide more comfort when deployed a large .tent annex can be extended at
the rear which is how the vehicle is portrayed in the diorama.
The kit features more extensive detailing than the M247, starting with the head
light guards (parts B6 8e 7) again being thinned down plus the addition of bolt
heads to the guards and hull lifting eyes (parts B4), bolt heads can be made
by slicing up stretched sprue salami style and attaching with a small dab of
liquid cement.

Click for larger view
The side skirt attachments
with bolt heads are added to the hull sides as the skirts are not always fitted
on the real vehicle. The fire extinguisher housing and handle are added behind
the driver's position and the small attachment points on the superstructure
front plate (part C3) are also detailed as is the generator with extra wiring
and small fittings. plus the power cord attached when the generator is in
use,
the engine exhaust is also drilled out.
When the upper superstructure is glued to the hull the resulting seam must be
totally eliminated by filling and sanding (only a few early vehicles show a
weld seam along this join line).
The aerial guards on the superstructure roof are replaced with thin card and
the many tie-downs added again using thin wire. A jerry can rack is added from
card with the securing straps from paper strips, the radios carried have aerials
of differing thick-nesses which can be represented by stretched sprue of corresponding
thickness.
The extended annex was built by-firstly making a frame from plastic rod and
adding tissue soaked in white glue, the tent flaps and securing straps were
added separately also using tissue. After this has dried the cam scheme was
brush painted as printed fabric has a hard edged pattern, while the winter MERDC
cam scheme was airbrushed onto the M577. The different camouflage schemes on
the two vehicles is quite common with units being rotated to Europe for training,
the crews do not always repaint their mounts.
All the marking are again Letraset and the model is weathered in the same manner
as the M247 with the characteristic 'sit' of the tracks achieved by attaching
them to the roadwheels with undiluted white glue.
The BASE & FIGURES
The base is a 450mm
piece of chip-board covered with 'Polyfilla' pre-coloured with water paints
(this adds greater depth of colour than just painting the groundwork when
dry).
 The large trees, which are commercially available, are airbrushed with various
shades of green (darker under the leaves and lighter on top) plus the various
small bushes, rocks, grasses (also available from good hobby shops) are all
added while the groundwork is still wet, as are the vehicle track marks.
The large trees, which are commercially available, are airbrushed with various
shades of green (darker under the leaves and lighter on top) plus the various
small bushes, rocks, grasses (also available from good hobby shops) are all
added while the groundwork is still wet, as are the vehicle track marks.
The vehicles, figures and other equipment is temporarily positioned to achieve
a natural sit in the ground, which when dry can have additional grass etc. added
if required with white glue.
A wash of darker browns and black is then applied over the whole base to highlight
the texture and details. The many storage boxes are scratchbuilt from plastic
card and strip with the woodgrain scribed into the plastic, the ESKI is also
built from card and the 'broken' M16 being cleaned has the chamber hollowed
out plus the bolt made from thin sprue as are the extra ammo rounds. Additional
items of equipment are from various accessory kits all painted before attaching
to the base.
The three 'grunts' are from the M577 kit with their heads replaced with items
from Verlinden's US Head set. the seated guy's arms are repositioned to hold
the magazine while the tank commander is from the M247 kit with his hand modified
to hold the 'tinnie'. The two cans of 'Budweiser' are made from small lengths
of sprue (I bought a can of the real thing to copy and later drank it, I was
amazed the diorama ever got finished after that - have you ever tasted that
stuff?) .
The centrefold was taken from an advert in Playboy magazine trimmed to size
and after all the painting was completed everything was glued into position
on the base. The diorama took about 100 hours to complete and was a most enjoyable
exercise.
Click for larger view
References:
- M247 Strategy
and Defence Magazine No. 91 Pages 59-66
- Combat Weapons
Magazine, Summer 1985 Pages 56-111
- Modern American
Armor Arms & Armour Press, Page 84.
- M577 Tanks
Illustrated No. 13
- US Infantry
Combat Vehicles Today Arms and Armour Press. Pages 18-20
- Squadron Signal
in Action No 17 'M113' Pages 35-36.
Click Browsers BACK button to return to list
Return to Home