

As you would expect this kit uses some of the parts from the previous kits that include a number of updates to the details as well as new parts such as the turret and full engine and compartment.
There were a number of accuracy issues identified with the Marder III H kit and I’m happy to say Dragon have addressed most of these in this kit with things such as the orientation of the hull machine gun ring now correct as is the location of the right hull side vision port. The lightening holes in the idler have been corrected as are smaller details such as the shape of the front towing shackle plates with a number of other parts have had the detail enhanced and Dragon are the be commended on addressing these issues.
There are still a few issues with the straight fenders being the most obvious and a couple of ring in bolt heads on the front plate (easily removed) but the remained are quite minor in nature and can easily be dealt with either during construction or with aftermarket items for those wanting true accuracy.
The kit:
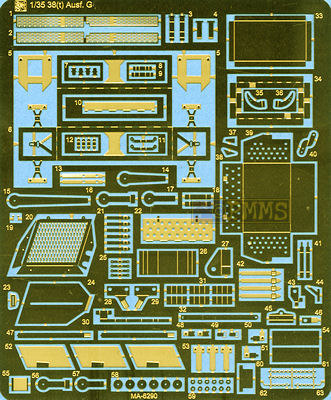
The kit consists of 340 parts in light grey plastic, 8 in clear plastic, a bag of individual track links plus a large etched fret and of course the instruction sheet and a small decal sheet.
Standard of moulding is again excellent overall with very few pin marks other than a few on the insides of the superstructure walls with the detail very clean and crisp due to the many plastic ‘nodes’ on the parts that do require a bit of care when removing but worth the effort for the clean parts. There is also no flash or other blemishes present with the track links which are cleanly moulded with just the usual small moulding seams to be cleaned from all the parts which is normal for any kit.
The kit includes the full fighting compartment interior for the lower hull from their previous kits #6249, 6331 as well as new detailed engine and engine bay and a comprehensive turret interior for a very comprehensive kit of the 38(t).
Hull:
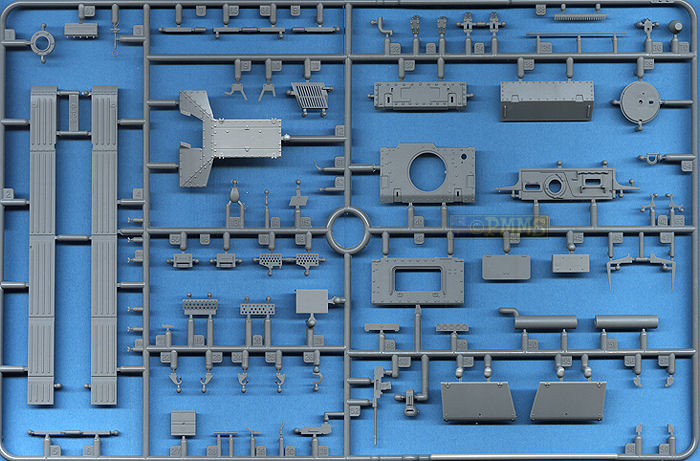
The lower hull tub has the floor and both sides moulded together with well defined detail on both sides of the hull walls for the inner fighting compartment and insides of the final drives and includes revised upper edges from the Marder III H hull.
The position of the right side vision port as mentioned has been corrected and is now in the correct position with separate visor cover and inner clear visor.
Detail on the tub exterior is very good with rivet detail on the bottom and sides as well as the idler mountings included with separate final drive covers and return roller mountings.
The separate front plate is in two parts to not compromise the detail on the upper and lower sections with the fit very good as is the separate tow hooks which now have the correct square profile but you should not attach this plate to the hull until the interior is done or there may be problems fitting the transmission/gearbox if you do attach the front plate now.
On the inside are two part final drive fittings and front brackets which fit snugly to the inner side walls with the transmission/gearbox having crisp details included for all the basic detail including the cooling ribs on the gearbox and textured drive shaft cover. The driver’s controls are in one piece and fairly basic as before but you also get all the levers as etched parts to replace the plastic parts for a far more detailed control assembly if you wish. If using the etched levers the plastic hand grips from part D58 have to be salvaged and added to the etched lever assembly and while needed a bit more work results in better defined control levers.
There are still no driver’s foot pedals included with three part seats but the mountings are again very basic plus the distinctive wooded mat for the lower floor is included and added to the rear and side walls are the main gun ammo boxes with the perforated covers included with the mouldings that should look okay once painted.
The radios fitted to the top of the transmission have etched racks for good detail definition but you will need to take care when bending this to shape as there are some fine bends required and using a good etched bending tool will help out here.
It should be noted that none of the available references, including the latest Panzer Tracts book No. 18 "Panzerkampwagen 38 (t) Ausf.A to G and S Production" give any indication that the radio is located in this position and appears to be conjecture. Locating the radio in this position would possibly conflict with other equipment items located here as indicated in the references, so take care if you fit the radio as per the instructions.
Once the transmission/gearbox is assembled this should be fitted inside the hull and you will have to flex out the front sidewalls slightly to insert the pins on the drive shafts (parts D46) into the final drive fittings (parts D55/56) and this is the reason for leaving the front plate separate as you won’t be able to flex the sidewalls to fit the transmission with the front plate in place.
The rear firewall and drive shaft fit neatly in place while the front seats and the front plate can be fitted but again you may have to flex out the side walls slightly to get this in place. The fit is good with the glacis also fitting neatly in place with the transmission visible through the separate inspection hatch and of course it’s best to paint the interior before adding the glacis and superstructure.
The separate glacis inspection hatch fits neatly into place without any problems and added to the glacis is the Notek light which has an etched part for the light face and the mounting bracket for added detail.
The separate Driver’s plate has additional separate parts for the two visor covers and round machine gun ring as well as the left corner aerial mounting and as mentioned most of the issues with the Marder III driver’s plate have been addressed with any deviations form the Panzer Tracts Ausf.G plans being so minor as not worth mentioning.
These include the circular machine gun ring which has the six retaining bolts correctly orientated and the position of this and the left visor altered with the only issue being the two central side bolts that shouldn’t be there for the Ausf.G but these are easily cut off to remedy this. Strangely the box top illustration and the instruction drawings show the plate without these bolts as it should be but they are on the part but as mentioned it’s very easy to fix this by just cutting off the offending bolt heads.
The visors have small etched brackets when showing them open and on the inside are the vision blocks in clear plastic, but watch as the right and left visor covers are different (parts B16, B60) so make sure you fit these correctly.
The hull ZB vz.35 machine gun has internal detail including the full receiver and a length of 7.92mm ammo belt with cooling ribs included on the barrel but these ribs are all one diameter when they should be wider on the portion of the barrel inside the external cradle to correctly depict the barrel.
The hull top plate has nice bolt head detail and the turret ring with raised bullet splash and has the driver’s hatch in two parts with well textured padded interior detail free from any pin marks. The fit of the roof to the hull is very good without the need for any trimming and also includes the rear wall of the engine compartment and obviously it is best not to fit the roof until the interior has been fully completed.
Added to the hull sides are the separate fenders which are moulded commendably thin with rib embossing raised on the top and indented underneath for some of the nicest plastic fenders that probably negate the need for etched replacements. The fender support brackets are all separate parts and also moulded nice and thin with a channel embossed along the hull side to locate the fenders.
There is an issue here as the 38(t) fenders have a distinct upward kink half way along the fender length with the kit fenders mounded perfectly straight. Included with the kit as before is a jig on sprue B for the kink contour with the instructions indicating you should bend the fenders using this jig as a guide?
Unfortunately the locating channel along the hull side is also perfectly straight and does not allow for the kinked fenders meaning if you do add the fender kink the fenders will not fit into the channel and the front of the fender will not mate to the top of the glacis/final drive housing as this is where the straight fender meets. So there is a fair bit of work involved altering the locating channel and other angles to incorporate the kink or just live with straight fenders.
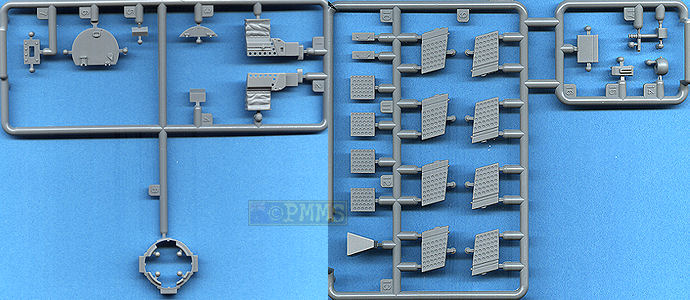
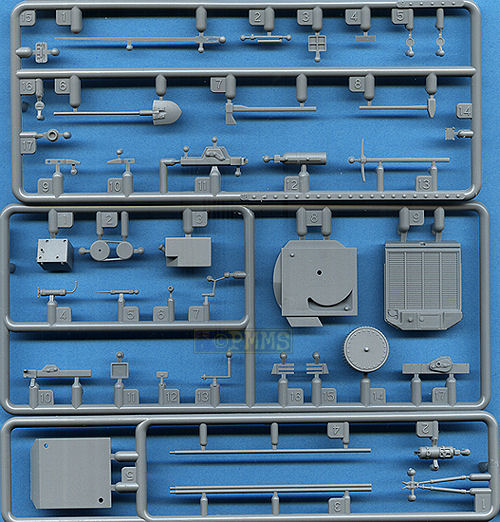
Other items added to the fenders are the typical perforated 38(t) storage box which is provided in both plastic and etched metal depending on your preference. All the tools are moulded nicely without attachment clips which are provided on the etched fret to add a nice detail touch and the jack is made up of 4 parts with etched brackets.
The engine deck has the central T section with separate engine access doors as well as separate plastic rear intake grill section with revised etched grill cover with the engine deck having nice details including the nicely represented hex bolts.
The grills located under the lip of the engine access doors are provided as etched parts and these better represent the actual grills but they are still located on the outside of the doors when they should be located in a recess on the inside of the door lip.
At the back is the separate rear plate which has the central round inspection hatch as a separate part and other smaller fittings including early and late style idler mounting brackets. Care is needed when fitting the rear plate as the rear hull tub sidewalls are bowed inward slightly at the top and careful coaxing was needed to fit the panel which straightens the hull walls in the process.
Added to the rear plate is the three part exhaust with separate outlet cover but the exhaust is 1.5mm too narrow when compared to the Panzer Tracts No.7-2 plans as well as the armoured smoke grenade box made up of 6 parts that need locating holes opening up in the rear plate for fitting.
The separate small intake grill has an etched screen cover provided as well as the sliding cover that requires the sides to be bent to shape which is quite easy using a good bending tool. One thing to watch is when you bend the side with the opening for the sliding cover to ensure you make the bend so the slot is fully open and not bent half way into the opening but if careful the door will easily slide open and closed after assembly. Added to the etched cover are small plastic bolts heads included on sprue K which you slice off and use as needed.
Engine Compartment:
New to this kit is the rear engine compartment and full Praga TNHPS/II 6 cylinder petrol engine with the rear radiator and associated fuel tanks and batteries to provide all the basic structures for a full engine compartment.
The engine block is in two halves with separate top rocker cover and a separate front bell housing with detailed fly wheel inside which is completely hidden after assembly but shows nice attention to detail. The detail on these parts is adequate but also a little plain on some when compared to photos such as the rocker cover but should be okay when looking through the open engine deck doors.
Added to the engine are numerous accessories such as the alternator, carburettor and exhaust manifolds with the fit of the parts quite good overall but the instructions will leave you scratching your head during assembly in some areas.
Part D1 shown in the instructions is actually made up of parts D1 and D10 and part D4 is again made up of part D4 and D11 with D10 and D11 not getting a mention, also the location of the large manifold (part D16) is incorrect and it should be mounted above the lower manifold (part D23), not below as indicated.
Some of the smaller items are a little vague in their location and careful study of the instructions and pictures of the assembled engine will help to get things in the right place. The large air cleaning sort of “hangs” out in mid air but thankfully the locating of the parts is quite precise and so long as you make sure it is sitting at the right angle as the glue dries there shouldn’t be any problems.
You can of course finish off the engine by adding the wring and plumbing from fine wire or sprue.
At the back is the large radiator with four parts, two for the radiator itself giving you nice mesh detail on one side only, the large fan coaming and a fairly basic fan moulded but this appears to a later style and not the usual fan on the 38(t) Praga engine. But this is not a big issue as the fan is not easily seen after assembly unless you show the rear plate inspection hatch removed.
There is a separate exhaust pipe that goes to join to the external exhaust pipe as well as the side mounted fuel tanks and battery with etched mounting bracket and again you can add the fuel lines and wiring to finish off.
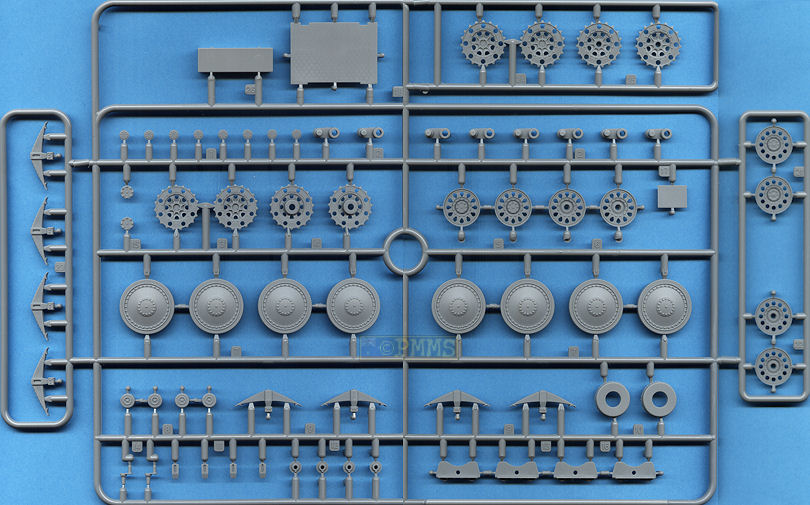
Suspension:
Each suspension bogie is made up of the hull mounting, two separate swing arms and the leaf spring unit which have been redesigned with the correct Ausf.G features and have a face plug that allows the arms to move but the springs are glued in place so there is only downward movement possible for the wheels after assembly. The fine mould lines on the springs are easy to remove with the bogie units are fitting together as you attach to the hull side as the spring locating pin is on the hull side and also used to locate the bogie mounting plate. Also the bolt head detail on the bottom of the bogie mounting plate has been enhanced to better represent the actual bolt head sizes.
The wheels are the correct size and have the correct number of rim bolts on both sides of the wheels with the hub bolts being enhanced on these wheels for better definition and these simply glue to the axle stubs on the swing arms.
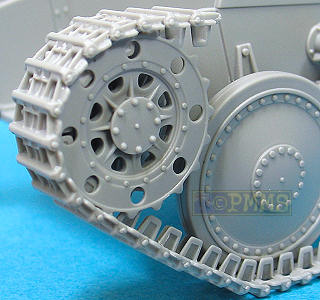
There are two sets of drive sprockets provided, the original sprockets with the 8 lightening holes around the outer rim with these having basic details on the insides of the sprockets.
The second new set of sprockets also have the 8 lightening holes and revised inner rib detail but the outer lightning holes are actually too large which can be seen by the holes overlapping the inner rim ridge with the holes on all sprockets I have seen not overlapping the rim ridge.
So while the new sprockets have better internal rib detail you are better off using the original sprockets with correctly sized lightening holes as this detail is more obvious than the inner ribs.
At the back the idler wheels have been updated with correct sized teardrop lightening holes and better look the part with the idler axle also revised allowing a little more movement of the idler position.
The return rollers have nice hub detail as well as the “continentau” embossing on the side wall but it’s a little oversized if you want to get real picky but will look good when painted and weathered to highlight the embossing, and it’s easy to convert the ‘u’ to an ‘l’ if you want to do this.
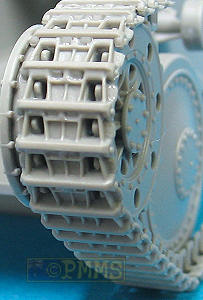
Tracks:
These are provided as individually moulded “magic tracks” which have nice detail including minute casting numbers on the edge of each link with no cleanup required.
The tracks are designed to be glued together and are not workable and you will have to incorporate the track sag as you glue the lengths together. By gluing a length together and letting the glue “go off” you can them add it to the suspension and add the curve around the drive sprockets and idlers as well as the track say easier.
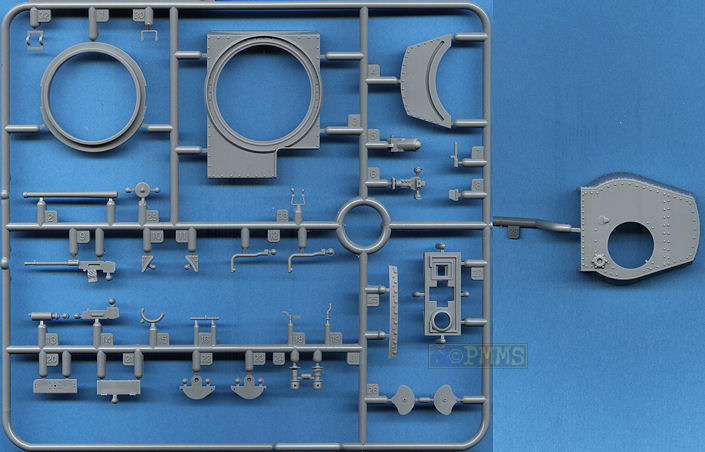
Turret:
The main turret shell is in one piece with separate turret ring, front chin plate and turret front plate, the underside of the turret bustle and the main cupola ring also in one piece with additional parts for the visors and top hatch.
Bolt head detail on the turret parts is well done and matches the correct pattern for the Ausf.G which is different in a number areas from the earlier Ausfs.
The cupola ring has clear periscope inserts and a separate front visor with the top hatch having excellent details including the padded interior but there are a couple of small pin marks to be removed, not on the padded section thank goodness.
On fitting the top hatch and fixed roof section you have to be careful as there are no actual locating points for the fixed roof section and it has to be set at an angle in relation to the front visor. The instructions do show the correct location but you should take care as it is easy to get wrong if not observant due to the lack of locating points.
Added to the front plate are the two side brackets for the gun mounting plus the co-axial ZB vz.35 machine gun and as with the hull MG has the full receiver and a length of 7.92mm ammo belt with cooling ribs included on the barrel but these ribs are all one diameter when they should be wider on the portion of the barrel inside the external cradle to correctly depict the barrel.
The main 37mm gun has the barrel in one piece with hollowed out muzzle and just the fine moulding seam to sand off with the barrel length being fractionally shorter than the 1:35 plans in the Panzer Tracts and MBI books but not enough to get excited about. The mantlet mounting is also in one piece with the barrel fitting snugly into the mantlet and on the inside the main gun is made up of just 5 parts but has the basics of the actual gun and is designed to elevate by trapping the gun between the two gun mounting brackets so don’t fit these before adding the gun. The left side sighting scope is designed to be movable and will elevate with the gun after assembly.
Other external details include the top mounting periscope and side grab handle as well as the lower front bolted chin strip added after the front plate has been attached.
The remainder of the interior sees the traverse gear, the Commander’s and Gunner’s seats and the 37mm and 7.92mm ammo boxes mounted inside the turret but mostly inside the rear turret bustle. To add these you glue them to the separate lower bustle plate and then add this to the turret meaning you have to fully paint everything before hand.
The fit of the turret parts was good overall without the need for trimming or filling.
Instructions:
These are the usual exploded view drawings but due to the complexity of some assemblies you will have to study the instructions carefully to avoid any confusion but overall there shouldn’t be any problems
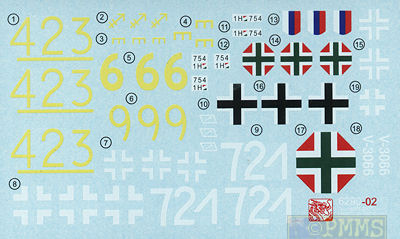
Decals:
There is one decal sheet with good colour resister on the printed markings and has markings for eight 38(t)s with a good mix of overall Dark Grey, overall Dark Yellow and camouflaged schemes.
6./Pz.Rgt.25, Eastern Front 1941 |
4./Pz.Rgt.204, 22.Pz.Div., Russia 1942 |
Unidentified Unit, Bohemia 1945 |
Pz.Rgt.21, 20.Pz.Div., Russia 1942 |
30.Pz.Rgt., 1st Field Armoured Div., Hungarian Army, Hungary 1942 |
Slovakian LT-38, Slokak National Uprising, 1944 |
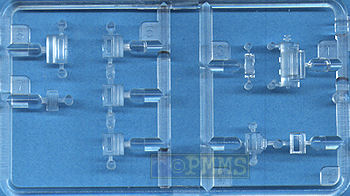
Clear parts
Conclusion:
Overall the kit is cleanly moulded with well defined details and will assembly quite easily for a good representation of the 38(t) Ausf.G with the full interior as an added bonus.
It's good to see most of the issues addressed and while there are still a few issues remaining the kit like any other can benefit from additional detailing for those wanting to add a bit more but overall will build into a nice kit.
Recommended 8/10 (the fenders are still a worry taking a bit of work to rectify)
The Sprues:
Click on thumbnails for larger view

Detail Images

Click Browsers BACK button to return to page
| Panzerkampfwagen 38(t) Panzer Tracts No.18 Thomas L Jentz Hilary Louise Doyle  |
>PRAGA LT vz.38 P zKpfw 38(t) MBI Publishing ISBN: 80-86524-01-9  |
PzKpfw 38(t) Tank Power Vol.XXI Wydawnictwo Militaria No.241 ISBN: 83-7219-241-3  |
| TANKS & ARMOUR: PANZER 38(t) Ian Allen Publishing ISBN: 071103091X  |
Pz.Kpfw 38(t)Ausf.A-D in detail Special Museum Line No.38 Wings & Wheels Publications ISBN 80-86416-58-5  |
PzKpfw 38(t) in action Squadron/Signal books #2019 Charles K. Kliment and Hilary L. Doyle. ISBN 0-89747-089-3  |
Thanks to my credit card and the excellent service from![]() for
the review kit.
for
the review kit.