
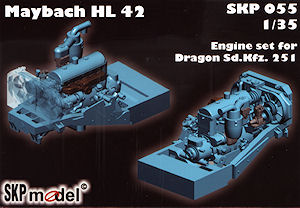
Maybach HL42
Engine set for Dragon Sd.Kfz.251
SKP Model 1:35 Kit #SKP 055
Review by Terry Ashley
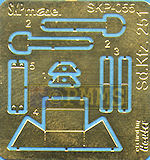
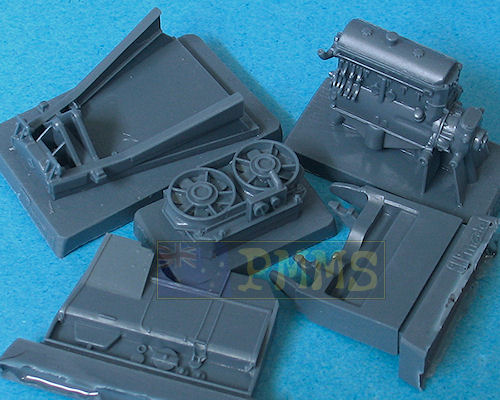
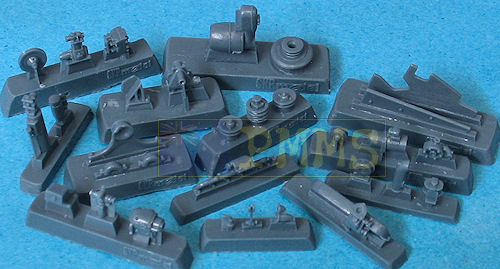
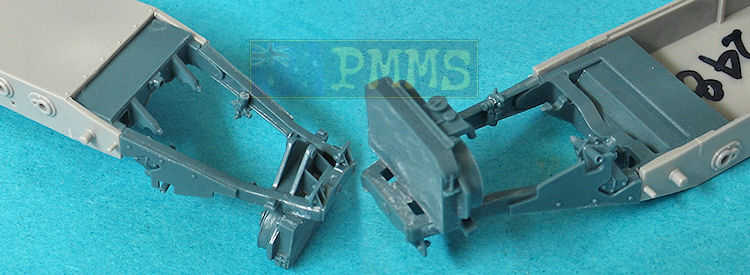
The set consists of 36 parts in a blue/gray resin which is cleanly cast without any blemishes such as air holes or warping with only minor resin film inside the manifolds to be removed along with a small etched fret with 8 parts and a small A5 sized 7 page instruction booklet to aid in assembly.
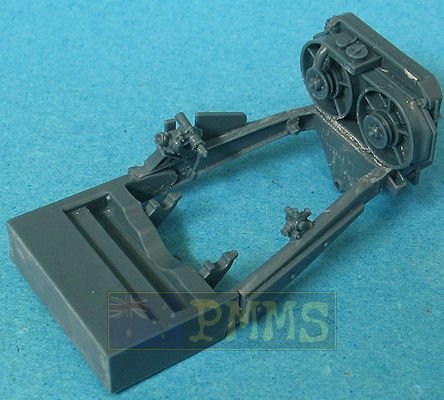
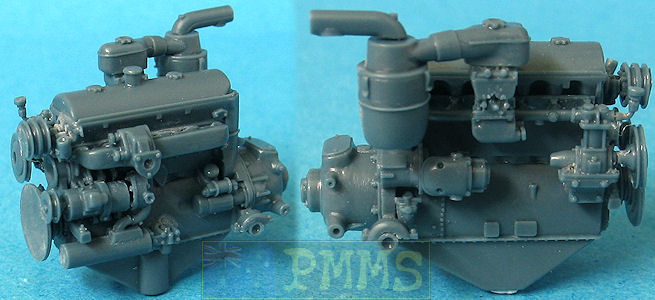
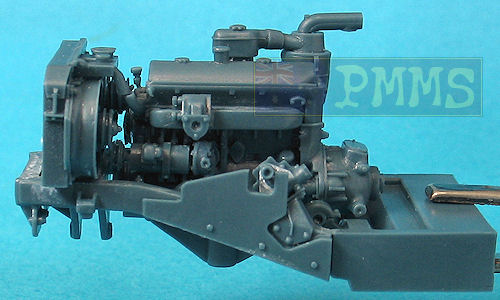
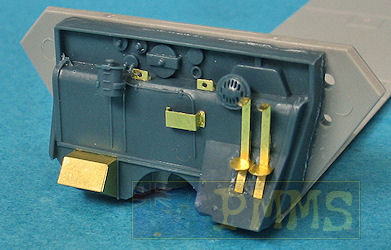
Resin parts
Click for larger view
Close new window to return to review
The resin used is quite hard and a little on the brittle side and this means care is needed when removing the casting plugs which are quite substantial on some of the larger parts. Due to this brittleness it is not advisable to use clippers to remove the plugs as this could crack the parts but using a good razor saw is the best option especially on the larger parts as mentioned. The etched razor saw from Lion Roar (set #LT0026) made short work of the plugs on the chassis, engine block and radiator parts as well as the smaller parts with final clean up using a sharp #11 blade.
Detail on the parts is very crisp and well defined with excellent detail such as on the engine block, radiator fans and the many smaller accessory parts. There are many very small and delicate parts with some having small pins to locate into corresponding locating holes to aid in assembly but there were a few issues due to the finesses of the parts during assembly which we'll get to shortly.
The detail on the parts match the excellent engine photos in the Wings & Wheels Sd.Kfz.251/1 in detail book "Special Museum Line No.37" very well with the book having as much detail as you could possible want and also shows clearly the additional plumbing as well as the exhaust pipe that needs to be added to the resin engine.
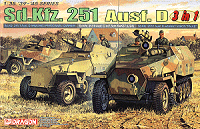
It should be noted this set is only applicable to the Cyberhobby/Dragon 251 Ausf.D kits as it will not fit to the Ausf.C kits without substantial work due to the miss-alignment of the engine firewall and different parts used (see comparison review for more info on this).
There are some modifications required on the Cyberhobby/Dragon kit parts before fitting the resin and etched parts that are quite straightforward for anyone with moderate experience. I have test fitted the engine set to the Cyberhobby/Dragon Sd.Kfz.251 Ausf.D and first you have to cut the front section of the lower hull (part X) that includes the engine sump, the front section of the floor to correspond the firewall location and the lower sections of the engine firewall with the instructions having illustrations clearly showing the modifications required.
Front section of floor removed entirely
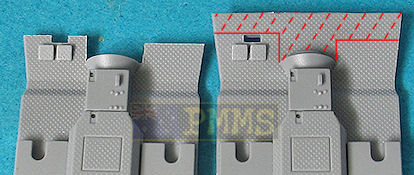
Hull tub and side panel modified
Firewall lower section removed
After cleanup of the resin parts assembly is quite straightforward following the very clear instruction steps provided with the position of the most parts clearly indicated on the resin parts themselves and in the instructions.
The lower chassis parts have the rear chassis box and forward chassis frame that fit together very precisely to take any guesswork out of what is the main step that governs the final alignment of the engine/chassis assembly. The large front radiator has excellent fan detail with two additional small pulleys. The fit of the steering box and other parts are also good apart from part A34 which is a bit of a mystery as this is the only part without the location indicated on the parts. You will have to refer to the plan views of the assembled engine to get this in the right place.
Moving the engine, this has the main engine block lower oil sump as one part with all accessories such as the intake/exhaust manifolds, dynamo, oil cooler/filter, carburetor, forward fan pulleys and the large air filter as separate parts. The detail on the engine parts is extremely well done but there is a lot of piping/wiring as well as the fan belts that will have to be added to really complete the engine.
Assembly of the engine parts is quite good due to the locating pins and precisely marked locating points for most parts and following the instruction sequences shouldn't pose any problems. The only issues I found were the mounting pins on parts such as the fan belt pulleys and smaller parts are quite fragile and broke often during assembly and handling while test fitting the engine into the lower chassis and kit hull.
To help strengthen these joins I drilled small 0.5mm holes in the parts and inserted short wire pins and this ensured the parts doesn't came apart after assembly.
Fitting the assembled engine to the lower chassis frame is very precise due to the rear engine mounts being included with the lower chassis cross member meaning they are perfectly aligned as they come. The engine mounting pins fit into these mounts with the front supports sitting on the small tabs inside the chassis frame. Once you have fully assembled and painted the engine the rear mountings could be securely glued to ensure nothing moves once installed in the kit hull.

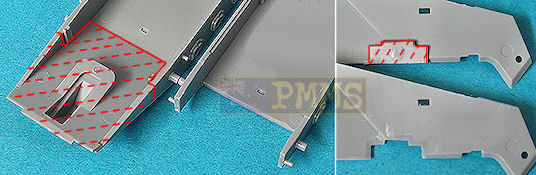
There is a new resin engine firewall face that fit to the modified kit firewall (part B7) to ensure the firewall is in the correct position is relation to the engine, the two firewall parts fit together easily after the modifications to the kit part.
Added to the firewall are a couple of resin parts and the 8 etched parts which shouldn’t pose any problems with the assembled firewall glued to the kit lower floor in the same position as per the kit assembly.
Attaching the fully assembled engine/chassis to the kit chassis is again very straightforward providing you cut away the forward section of the kit lower hull exactly as indicated in the instructions as there aren’t the side lugs on the hull as there are on the AFV Club kit chassis. This is just a design feature of the kits and not an actual problem as such.
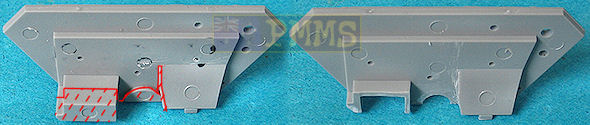
Engine and firewall fitted together, note how new resin firewall extends the kit firewall forward
to the correct position to align with the engine correctly.
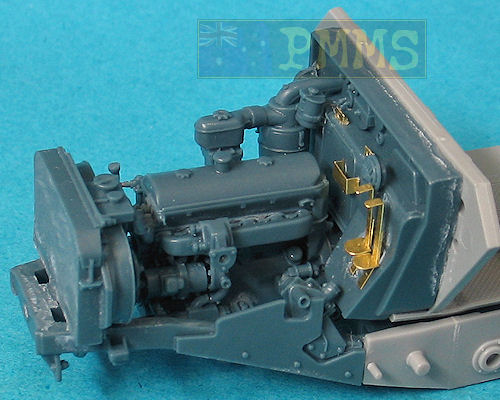
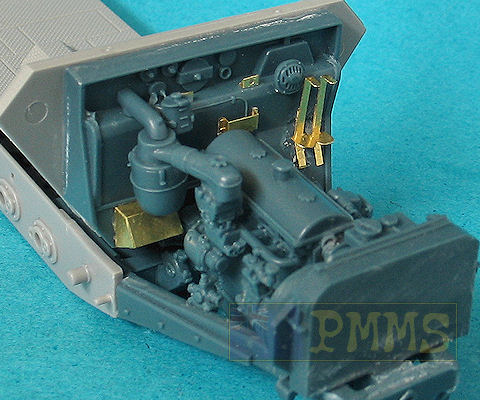
There is one issue due to the Cyberhobby/Dragon engine firewall/bulkhead not being deep enough which means it is too far back from the engine. To remedy this SKP have provided the forward section of the firewall which is fitted to the kit firewall after the modifications mentioned above.
This means the new resin engines bell housing can’t protrude through the lower firewall into the crew compartment as per the real 251 and the AFV Club 251 kits but this may not be that apparent on the assembled kit.
which allows the engine bell housing to protrude into the cabin as it should.
With the Dragon Firewall underside being too shallow requiring the SKP resin firewall extension
the bell housing doesn't protrude into the cabin even though the engine is positioned correctly in the chassis.

The kit front axle and other suspension parts are added to the resin mountings included on the lower chassis frame with these assembled as per kit instructions. Overall I found the fit of the resin engine and the firewall with the added etched parts to be very good and didn't require any further trimming to get a good fit such is the precise fit and alignment of the parts.
The instruction booklet has very clear line drawings of the assembly sequences with all the parts clearly numbered and the position indicated with shaded areas on the drawings as well as the usual arrows, these arrows are also in red to give a good contrast to the black lines of the parts drawings which further adds to the clarity.
There is also a full parts layout diagram with the parts numbered and 5 view plan drawings of the assembled engine/chassis which helps locate any parts that may need additional clarification.
If you want to add an engine to your Cyberhobby/Dragon Sd.Kfz.251 Ausf.D then you will do no better than this very well done set, the only additions required are the numerous radiator pipes and the large exhaust pipe as well as the fan belts to really finish off the excellent resin parts.
Very highly Recommended.
 Sd.Kfz.251/1 in detail Special Museum Line No.37 Wings & Wheels Publications ISBN 80-86416-50-X |
 Sd.Kfz.251/1 Ausf.D Model Detail Photo Monograph No.22 RossaGraph ISBN : 83-89717-60-3 |
 SdKfz251 Ground Power Special GALILEO Publishing Co.,Ltd |
 Sdkfz251 Ausf.C & D Panzer Tracts No.15-3 ISBN 0-9771643-5-7 |
 Schutzenpanzer (Armored Personnel Carrier) Ryton Publications ISBN: 1930571291 |
Thanks to SKP Model for the review kit.
