
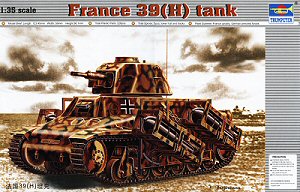
France 39(H) tank
Trumpeter Kit No. 00352
1/35th Scale
Review by Terry Ashley
The kits have now been released so we’ll have a look at what you get and how it all goes together with some basic construction notes along the way, the kit we’ll look at first is the H39 SA38 with the longer barrelled 37mm gun in use with the German Army who made some modifications such as the cut-off commander’s cupola with split hatches as well as being fitted with two 32cm napalm rockets on each hull side but all kits share the same lower hull, running gear and track.
This kit consists of 226 parts in light beige plastic plus two full length “rubber band” type vinyl tracks and a small decal sheet. The quality of the moulding is overall quite good but there are some pin marks on a number of parts that will need attention, such as on the insides of the hatches and on the back of the road and idler wheels but these can be positioned facing inwards and out of sight.
Lower Hull / Suspension:
The lower hull tub has the front and rear panels included and at
the front is the large HOTCHKISS name casting which is very prominent on these
vehicles
while on the inside is floor details and a rear bulkhead to help keep everything
square. The final drive housings and idler wheel mounts are separate parts
as are the two return rollers per side plus simple attachments points for the
suspension bogies.
The six suspension bogie units are made up of eight parts each with quite good details but the upper springs are a little fine and some may wish to replace with thicker wire for a better appearance? The drive sprockets include the characteristic dome shape but unfortunately the central bolt heads and drive teeth are undersized but may not be that noticeable on the finished kit?
There are two idler wheels provided, one with ribs and the other smooth and the instructions indicate to use the ribbed wheels on the kit but I’ve seen photos with both types so you have choice here.
 Construction of the bogies was a little tricky as there is no actual locating
point for the top mounted springs and these were simply glued to the rear bogie
plate at the appropriate place level with the moulded on attachment bolts on
the outside of the bogie plates.
Construction of the bogies was a little tricky as there is no actual locating
point for the top mounted springs and these were simply glued to the rear bogie
plate at the appropriate place level with the moulded on attachment bolts on
the outside of the bogie plates.
The wheels are designed to rotate when trapped between the front and rear bogie
plates but there are only a couple of small attachment points for the two bogie
plates and the top brackets (part A15) have to be positioned over the two bogie
plates at the same time as positioning the wheels which was all very tricky
and I ended up gluing the wheels in place which made for a much more robust
assembly and as the drive sprocket and idler wheels are only designed to be
glued in place gluing the wheels is not an issue. What is an issue is the fitting
of the bogie units to the hull, the locating pin on the hull fits into the
corresponding hole on the back of the bogie bracket (part A15) which also has
a small L bracket to fit under the bottom of the hull for support, unfortunately
the hole on part A15 didn’t line up precisely with the pin on the hull
and required some trimming of the bracket (part A15) to get the bogies to sit
correctly on the hull, this isn’t a real hassle as after trimming the
bracket they then fitted okay and at the same height.
Upper Hull:
 The main hull moulding which features the various contours of the
cast original has the front section, front driver’s hatches and rear
engine deck as separate parts for better detail definition. There is no cast
texture
to the
hull but from photos this texture appears to be quite smooth in any case compared
to other cast hulls and the contours appear to be captured quite well. One
problem is the shape of the two round vision ports either side of the driver’s
compartment which are moulded oval on the hull, but given the constraints of
injection moulding this is probably the best that could be done other than
to provide them as separate parts?
The main hull moulding which features the various contours of the
cast original has the front section, front driver’s hatches and rear
engine deck as separate parts for better detail definition. There is no cast
texture
to the
hull but from photos this texture appears to be quite smooth in any case compared
to other cast hulls and the contours appear to be captured quite well. One
problem is the shape of the two round vision ports either side of the driver’s
compartment which are moulded oval on the hull, but given the constraints of
injection moulding this is probably the best that could be done other than
to provide them as separate parts?
The prominent join line between the front hull section (part D1) and the main hull (part B20) will require eliminating and the sides don’t quite match evenly requiring some smoothing out and there are also some join seams between the final drive housings and the front plate that will need elimination as this area is quite smooth on the real hull.
The fit of the driver’s doors required a little attention with trimming of the larger door for a good fit and the two large hinge bolts either side of the top driver’s hatch will have to be added as these are quite prominent on the real vehicle.
The engine deck intake grills are fully open for good definition but you could add some card on the inside so you can’t see down into the vacant engine bay from above and also the grills sit a little low in the hull cut-out but should be glued level with the hull top.
The hull has a basic interior with rear engine bulkhead and drive tunnel to the front gearbox and a basic driver’s seat, this at least gives something to see if you leave the two large front two part driver’s hatch open but if you build the kit buttoned up then you can just skip the interior.
The full length side fenders are also separate parts but ensure you attach these before fitting the top hull as it will be very difficult to add later, another thing to watch is that for this version there is a large storage bracket attached to the rear hull and you have to open up the locating holes in the rear hull for this. This is not shown till step 24 of the instructions while the upper and lower hull are joined in step 9, so make sure the holes are opened up before fitting the hull parts together.
The fit of the upper and lower hull parts needed a bit of minor trimming and test fitting to get a snug fit and after gluing together the join lines both front and rear will need eliminating as again these areas are smooth on the real vehicle but the fit is quite good so only small gap lines are evident.
There are numerous other fittings around the hull including the rear exhausts with separate heat shields and the join line between the exhaust outlets (parts B30) and the hull should be eliminated as this area is again smooth on the real thing. There are the front and rear towing shackles plus pioneer tools on the fenders and hull sides and these could benefit with the attachment clips being replaced with etched clips as with any kit which I’m sure will be coming soon from one of the etched detail producers?
Turret:
 The main turret shell is a single moulding with separate large rear
hatch and three vision blocks with the top cut-down Commander’s hatch
having separate split hatches and small lifting hooks for the exterior. The
37mm cannon
is split vertically with basic breech detail and breech guard for the interior
but the collar on the barrel (part D3) is too big and should be the same diameter
as the mantlet extension and the three brackets slightly further back.
The main turret shell is a single moulding with separate large rear
hatch and three vision blocks with the top cut-down Commander’s hatch
having separate split hatches and small lifting hooks for the exterior. The
37mm cannon
is split vertically with basic breech detail and breech guard for the interior
but the collar on the barrel (part D3) is too big and should be the same diameter
as the mantlet extension and the three brackets slightly further back.
The gun is designed to be trapped between the upper and lower turret halves
but the fit is quite sloppy and it would be better to glue the gun in place.
The bottom section of the turret also traps the rear hatch hinges between the
upper turret so take care here if you want the hatch to open and there is a
large gap to be filled around the hinge which may be better to fill in with
plastic card before gluing the turret parts together. The fit of
the vision ports also required some minor trimming for a good fit and test
fitting will determine the trimming needed but the Commander’s hatch
was a good snug fit to the turret roof.
Additional parts for this version include the wooden rocket racks which have
wood grain effect included as well as some sizable pin marks but these are
on the insides of the parts and may not be seen after assembly as filling these
will compromise the wood grain texture,
The 32cm rockets are in two halves with a separate tail cap and the assembled
boxes are fitted to the nicely detailed mounting plates attached to the fenders
which are basically the same as those fitted to the Sd.Kfz.251 “Stuka
zu Fuss”
The mountings for the rockets fit to the fenders without modification to the fenders so it is easy to build the kit as a straight gun tank if you wish but the Commander’s hatch will have to be altered back to the dome type for a French Army vehicle but unfortunately only the cut down split hatch is provided in this kit.
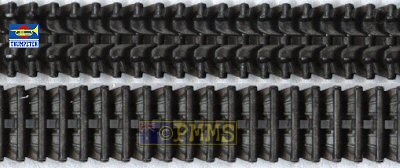
Tracks:
The tracks are full length vinyl and have quite well defined details on both
sides and should look okay on the finished kit, the instructions show to fit
these before attaching the upper and lower hull parts as there is not a lot
of room under the fenders is fitted later.
Decals:
The small decal sheet has markings for two vehicles in German Army service
but still retaining some the French Army markings for quite interesting schemes.
Conclusion:
Overall a nice rendition of this early war vehicle with the feel of the H39 captured quite well, there are some minor fit issues and a few join seams that need eliminating but where you have separate parts on a cast hull this is inevitable.
This kit and the others in the series should be welcomed by Allied modellers as well as German modellers with kits for both and adding black crosses on any kit should help sales these days.
It remains to be seen how the H39s from Bronco Models stack up against these Trumpeter kits when they appear but a bit of choice never hurt anyone.
Recommended.
Click on thumbnails for larger view


Close new window to return to review
References:
On the net.
There are many wartime H39 photos here as well as some of the Saumur H39 which should come in very handy when building these kits. http://www.chars-francais.net/archives/hotchkiss_h39.htm
 for
the
review kit.
for
the
review kit.
Page created 30 November 2004