
Baureihe 52 mit Steifrahmentender
Voyager 1:35 Set # PRO 35002
(for Trumpeter #00210)
Review by Terry Ashley
Voyager Models have previously released five individual update sets for the Trumpeter Baureihe 52 mit Steifrahmentender (Kit #00210), these being Set#PE35097 Smoke and Driver wheels, Set #PE35098 BR52 update Pt.1, Set #PE35099 BR52 update Pt.2, Set #PE35100 BR52 Driver’s Cabin and Set #PE35101 BR52 Tram and these have now combined together in this one huge update set in the PRO series.
But this new set PRO35002 is not just the five sets packaged together but also includes some additional update items most notably a full resin cabin/boiler firewall to replace the kit part with a far greater level of detail as well as some other minor additions.
As you can imagine if you have seen any of the individual sets, this PRO set is massive consisting of 19 large etched frets (approx 95mm x 95mm) in different thickness brass for the different parts, 3 smaller frets with chains and bolt heads, a couple of dozen small individual brass hex bolts, 28 resin parts, a dozen or so lengths of plastic rod, a sheet of plain white plastic card, a sheet of photo film with dial and gauge faces, three pieces of actual real wood veneer for the cabin floor, a bag of “scale” coal and two etched name plates to add to the model display base and a 14 page instruction sheet to help put it all together.
The standard of the etched parts is excellent with engraved detail and raised relief on other detail as well as finely engraved tread plate pattern along the walkways and as mentioned different thickness metal for different parts for better definition plus the usual engraved bending lines where required.
The lower boiler support frames are in thicker gauge brass with most others in thinner gauges more common to etched update sets. One thing to note is some of the parts are slightly bowed on their frets but being metal it is quite easy to straighten these out with gentle finger pressure with this most prevalent on the thicker parts. But some of the thinner frets are also bowed slightly and gentle rolling on a soft surface should straighten these before cutting off any of the parts.
The resin parts are cleanly cast in a light cream resin without any air holes or other blemishes and just the usual casting blocks to be removed before use and most simply replace the kit parts without alterations.
Many of the sub-assemblies are very intricate and detailed and previous experience working with etched parts would be handy and as soldering is probably the best method of assembly some experience here would also be an advantage with this set definitely not for the in-experienced or faint hearted.
As the set is extremely detailed I won’t describe everything but concentrate on the major assemblies and refer you to the scans of the instruction sheets to see the full extent of what’s involved.
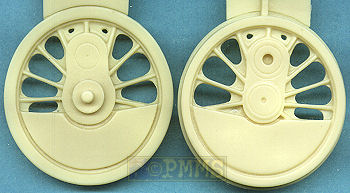
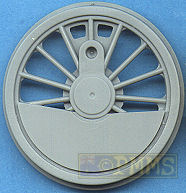
The two main drive wheels (kit parts G22) are replaced with resin items as the kit wheels don’t have the correct inside profile when compared to photos and these are just substituted for the kit wheels while assembling the wheels.
The many wheel brake pads are provided in resin with etched mountings and these are more detailed than the kit counterparts with numerous other etched parts added around the lower chassis.
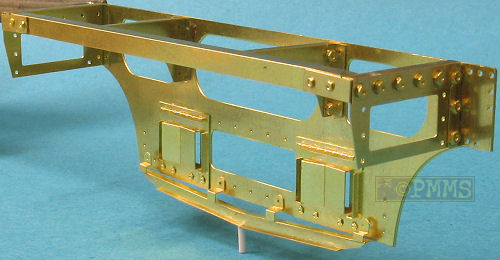
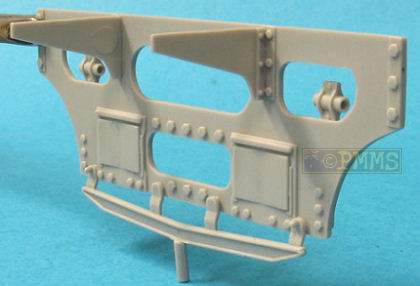
All the large lower chassis support brackets and bulkheads are replaced with thick metal parts that include numerous smaller items in thinner metal, many with quite tight bends and some intricate assembly. The use of a good etched bending tool will be essential for assembling this set and careful study of the instructions beforehand and test fitting will also help eliminate any problems.
Added to the assemblies are hundreds of separate etched bolt heads with holes in the parts indicating their location as well as the turned brass bolts to use in specific locations where one part must line up exactly with another and you use the brass bolts exactly like the real things to secure the parts. The only difference being once you have slipped the bolt through the holes in the two parts you secure the bolt with cyanoacrylate or solder instead of the nut on the real train.
The bolt heads could send you batty after a while but the result looks quite impressive as do the assembled bulkheads and I have partially assembled the rearmost bulkhead that includes the cabin entry ladders to give an indication of the additional detail. You should note that the metal parts are not straight reproductions of the kit parts but have some details included which are either not there in the kit or the assembly sequences are different. The assembly here is an example where the steps are included with this assembly (not added yet in the image) while they are added later with the plastic parts.
After the lower chassis the next major assembly is the crew cabin which is essentially completely replaced with brass and resin parts and only some small detail items remaining from the kit.
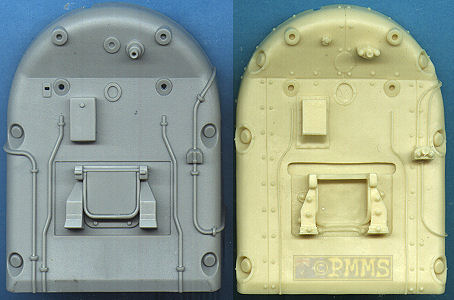
The replacement resin boiler firewall is quite impressive with considerable more detail than the kit part including many rivets and panel join details. Added to this are many smaller resin and etched parts as well as the photo film for the numerous gauges with this virtually being a small kit in itself but again the result will be far more detailed than the standard kit item.
The cabin as mentioned is made up entirely of etched panels that will require care with some of the bends needed and during assembly with again many smaller details added inside the cabin as well as clear sheet windows that are trapped between etched window frames. The small window hinges can be made workable using the thin rod provided if careful to give an indication of the detail included in the set.
For the floor there are sections of actual wood veneer with the floor itself made from the sheet of plastic card provided and the instructions have a full sized template with the floor shape to aid in getting this the right size and again the cabin is more like a full kit on it’s own that will test your skills using etched parts.
All the walkways along the sides of the boiler are provided as etched parts as are the large smoke deflectors at the front but many photos show these being made of wood panels as they are with the Trumpeter kit and not metal as included in this set. I have only seen one photo that looks like the deflectors may be metal but it is inconclusive so this may be one area where you may want to stick with the kit parts for more authenticity.
There are many other detail parts to be added around the train such as side storage boxes with separate doors and hinges that again can be made workable if you feel inclined and finally the coal truck receives many smaller detail parts in etched metal as well as the “scale” coal to fill it with. Not sure what constitutes “scale” coal as this comes in many sizes but anyway it saves you hunting this down in the railway section of you local hobby shop.
The instructions are the usual exploded view drawings and considering the many complex and intricate assembly sequences do a more than adequate job. But as with any detailed update or kit careful study of the instructions will be essential especially before bending any of the parts and test fit before gluing or soldering the parts as some of the smaller parts don’t give much margin for error.
Conclusion:
This is fairly simplified description of what is a massive update set that
essentially replaces much of the kit with just the main chassis, boiler and
coal truck and some smaller kit parts remaining. In some respects this is
more an exercise in engineering and metal working than a “normal” update
set.
But the set is certainly a challenge and the result extremely impressive completely transforming the base kit and while it will be just too much for some others will relish the challenge for that alone.
One thing is for sure if you tackle this update and see it through to the end there will not be any other etched update set that will pose any problems and your skills will certainly have been enhanced through the experience.
Highly recommended for experienced modellers who want to produce something special and don’t mind a challenge
Thanks to Voyager Models for the review set.
Page Created January 10, 2007