
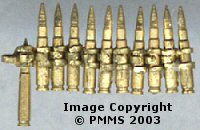
MM003 .50cal Full Shells with ammo belt
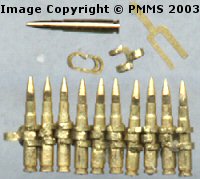
MM004 .50cal Spent Shells with ammo belt
Reviews by Terry Ashley
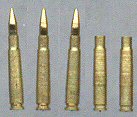

These new sets from Mission Models have individually machined .50cal rounds in brass with both full and spend rounds plus etched ammo belt clips to give a whole new dimension in detail.
Each set consists of 25 rounds plus the etched clips and each round is produced with meticulous attention to detail from the contours of the casing to the detail on the base. The rounds are true 1/35th scale which means they are quite small but the detail is still evident when looking at the rounds with the naked eye.
To assemble the clips a magnifier either worn on the head or free standing
will come in real handy as well as two pairs of fine tweezers, a good light
source and a fair serving of patience.
Use good quality tweezers that don’t ‘twist’ when you pick
things up or you will easily send the shells and clips into the dreaded ‘ping’ orbit.
Just a quick point in the images below, the rounds are quite small and the images are enlarged considerably to show the detail and this makes the rounds look rough. This is only a distortion of the scanning process and the surface of each round is quite smooth and well finished as are the etched clips.
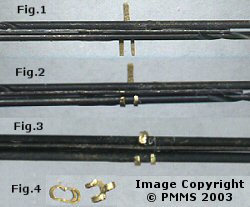
After removing the “Y” clips from the etched fret they have to be bent to accept the rounds, the clips are designed to intermesh with the next one and held together by the round itself, the instructions supplied show this and the trick is to ensure each side has the same size ‘circle’ or they won’t intermesh properly.
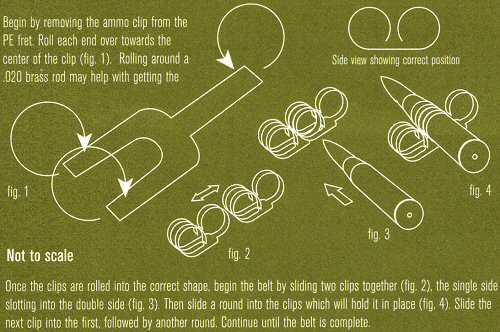
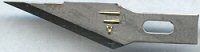
After a bit a trial I found this method worked well, firstly get two 0.20 sized drill bits (or wire) and a small thin piece of spare etched metal fret. Lay the two drill bits with the etched metal in between for spacing over the centre of the “Y” clip (see Fig.1) and while applying finger pressure to hold the drill bits in place bend the clips around the drill bits using a X-Acto blade ensuring the bends are straight (Fig.2 & 3). When bent you will have a clip with the same sized ‘circle’ on both sides (Fig.4) but don’t worry if they don’t go all the way around as in the instructions as you will finish the bend when the round is in place later.
To fit a new clip intermesh the clips together and slip a round through the three circles which then holds the two together. The first one is the trickiest but they get easier as your belt grows as there is more to hang onto when attaching the next shell. After positioning the round you can then apply a bit of pressure with the back of the X-Acto blade and crimp the clip ends as far around the shell as they will go (not the sharp edge as you don’t want to cut the clip just bend it). This added crimping helps hold the round in place but a small dab of liquid super glue will also help.
Just repeat this procedure for as many rounds as you want on your belt and I found after a few you get into a rhythm much like when assembling individual track links.
Being completely new it may take a while to get the hang of this but the end result really does look good and vastly superior to 2D etched ammo belts.
It have test fitted the rounds the new Academy .50 cal MG and they fit into the feed shut precisely which also means Academy got the scale right on their .50 cal but some others didn’t fair as well. I also couldn’t get the rounds to fit any .50cal ammo box available not because of any fault with the MM rounds but because the sides of most plastic ammo boxes are way too thick and some modification will be needed, there is also some variation in the sizes of ammo boxes provided by different manufacturers so you may have to get the best ‘fit’ from those available.
Conclusion:
Superbly detailed rounds that will add greatly to the details on any allied
vehicle or diorama, the assembly is a little tricky but once you get the
hang of it they went together well. Obviously the small size could present
it own problems but by using whatever visual aid you need and some good lighting
and tools you will get a satisfactory result.
The 25 rounds in each set will take care of a few vehicle mounted .50cals and
the spent shells will look good to add a used feel.
As I mentioned once you get into a rhythm I didn’t find these ammo belts
much different than assembling a few hundred individual track links except
in a much smaller size.
See the Mission
Models site
for ordering details.
Thanks to Jon from Mission
Models for the review samples.
The set will also be available shortly through Rainbow Ten in Japan.
Page created 30 December 2003