
German 20mm Flakvierling 38 & FlaK38
Barrels and ammo magazines
Voyager Kit No. VBS0137 & VBS0138
1:35 Scale
Review by Terry Ashley
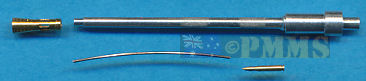
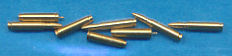
There are actually two sets released which we will look at together, set #VBS137 20mm Flakvierling 38 which consists of four 2cm FlaK 38 barrels, a selection of brass 20mm rounds and shell casings plus four etched frets with 20 round magazines and replacement brass magazine brackets for the donor kit 2cm gun receiver.
Set #VBS0138 20mm FlaK 38 has a single 2cm FlaK 38 barrel and a single etched brass fret for the 20 round magazine and replacement brass magazine bracket for the donor kit 2cm gun receiver. These are the same etched frets as in the Flakvierling set #VBS0137, hence the four frets included in that set.
Additional 2cm rounds and shell cases included in the Flakvierling set
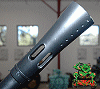
The 2cm barrel is the same in both sets and has the aluminium barrel tube that includes part of the gun housing as well as the two textured barrel changing grips on the tube with a separate brass flash suppressor cone plus the small etched securing bracket on the top of the housing section.
The only cleanup required is the small attachment burs on the etched parts prior to assembly with the barrel and flash suppressor blemish free.
The flash suppressor and barrel length matches well to the 1:35 plans in Panzer Tracks No.12-1 - Flakpanzerkampfwagen IV and other Flakpanzer projects development and production from 1942 to 1945 and Nuts and Bolts Vol.13 Flakpanzer IV & Vol.25 Flakpanzer IV Wirbelwind (Sd.Kdz. 161/4), Ostwind & Kugelblitz with the actual measurements being; full length of the gun (receiver and visible barrel including flash suppressor) 2252.5mm which equals 64.357mm (rounded to 64.4mm) in 1:35 scale and the visible length of the barrel tube with flash suppressor is 995mm equalling 28.429mm (rounded to 28.5mm) in 1:35 scale.
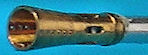
The Voyager barrel length is 28.5mm to be spot on. The flash suppressor has six small neck openings but references indicate two of these should be half the length of the other four and there are also four rows of small holes in the suppressor cone which is one of the correct configurations for the cone holes. The outer edge of the suppressor cone is also quite thin for a good appearance.
Additional detail include a small etched fitting for the top of the gun housing section and the additional etched parts for the magazine mounting bracket to detail up the gun receiver, this requires you to carefully cut away the moulded on mounting bracket from the kit gun ensuring the sides of the receiver are level after removing the bracket. A quick note, the DML 2cm gun has an indentation on the side of the receiver for the magazine while the Tristar and Trumpeter guns have flush sides, this makes the fit of the magazine on the DML guns more accurate.
The bracket is easily bent to shape with fine engraved bending lines where required and this can be glued to the gun receiver using cyanoacrylate
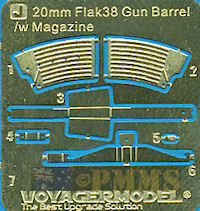
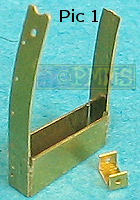
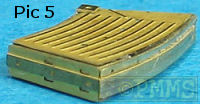
The base and spines (part 3) have small side sections that need to be bent upward and it is very important to bend these as tight as possible to the width of the two spine sections to minimise any gaps after bending (Pic 1).
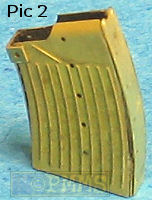
The two spine sections form the ends of the magazine and require subtle curves added to correspond to the curvature of the magazine sides and you can use the magazine sides (parts 1,2) as guides as no other indication is given (Pic 1). The spines should also have small inspection holes but these are not included. The two magazine sides (parts 1,2) also require small curves inwards added at the top and these were added by laying the part across a small drill bit and curved around with a small rod to give a smooth bend (Pic 2).
When attaching the two embossed side faces it is very important they are glued (or soldered) perfectly square with the base to make sure the two sides line up correctly (Pic 2). This will have a marked effect on the final appearance if the two sides are not lined up correctly at this point.
The two spine sections are then attached and it is probably best to solder these to fill in any small gaps that are present but using thick cyanoacrylate can be sanded after curing (Pic 2).
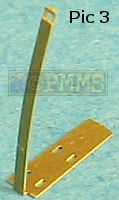
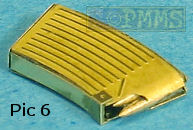
Finally the base and larger spine rib is added and again it is important this is lined up perfectly square on the base to ensure the rib sits evenly along the magazine spine (Pic 3). The top “U” section (part 4) is added at the top of the shorter magazine side to secure the join to the sides (Pic 2).
The assembled magazines certainly look excellent with very well defined details but will require careful positioning and bending of the parts during assembly for best results and you can then add the 20mm rounds as you wish but just gluing two at the top with thick cyanoacrylate is sufficient for the right visual effect. If using the magazines fitted to the gun receiver not fitting the rounds is obviously better, leaving the rounds to be used elsewhere.
and not this set but the assembly sequence is the same.
Note small gaps that can be eliminated with careful bending and filed smooth after soldering.
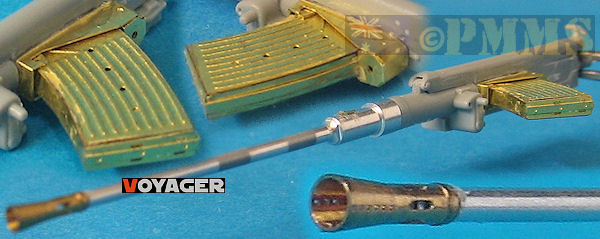
Assembled Magazine

Detail image showing the assembled 2cm magazines, the flash supressor
and the embossed hand grips on the barrel tube.
On the Trumpeter gun the dimensions are all over the place, the top cover is too short and the raised section on the housing too far back and the barrel length too long. The cut has to go in front of the raised ridge to achieve the correct overall length as in the image below. It can be seen from the image the short top cover and gun housing, the barrel length and the flash suppressor way oversized resulting in the overall length being just over 1mm too long on the Trumpeter gun. Fitting the Voyager barrel will solve some of the issues other than the short top cover and the raised ridge which can be shaved off if using this gun.
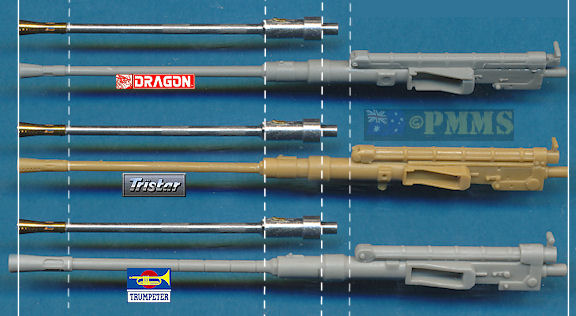
The only minor issue is the rear gun housing section slightly short thereby not matching exactly with the detail on the newer DML and Tristar 2cm guns requiring a little care when cutting off the plastic kit barrel.
As mentioned the recess in the DML receiver makes fitting the new magazine more precise than on the other guns without the recess, but may not be noticeable when partially hidden behind the gun shields on the final model.
Overall this barrel is very well done and will add considerable detail enhancements to whichever gun it is used on without too much trouble (other than the Trumpeter gun which needs more work). The Flakvierling set will also be very handy with the flood of kits coming soon from AFV Club, Bronco and DML along with those already available from Tamiya and Trumpeter.
Highly recommended.
See a full comparison of available FlaK38 barrels. (this will be updated shortly to reflect this new barrel)
 2cm
FlaK38
2cm
FlaK38Muzzle Reference images
| Flakpanzer IV Wirbelwind (Sd.Kdz. 161/4), Ostwind & Kugelblitz Nuts & Bolts Vol.25  |
Flakpanzerkampfwagen IV and other Flakpanzer projects from 1942 to 1945 Panzer Tracks No.12-1  |
German
20mm FlaK in WWII
1395-1945 Schiffer Military History ISBN: 0-88740-758-7  |
| Halbketten Zugkraftwagen 8t Sd.Kfz.7/1/2 AFV Super Detail Photo Vol.9 Published by Model Art Co.Ltd.  |
Sd.Kfz.7 in detail Special Museum Line No.36 Wings & Wheels Publications ISBN 80-86416-60-7  |
Flak Auf Sd.Kfz.7 Part 1 Kagero Photosniper No.9 ISBN: 83-914824-3-X  |
| Flak
at War Trojca Publications Waldemar Trojca, Karlheinz Münch ISBN: 83-60041-15-6  |
Ground Power Magazine #66 - 11/1999 GALILEO Publishing Co.,Ltd. Japan  |
Thanks to my credit card for the review Set.