
Mayback HL 42 Engine for Sd.Kfz.251
1:35 Set #35A12
Review by Terry Ashley
JP Hobby from the Czech Republic has released this resin Maybach HL 42 Tukrm (engine) for the Sd.Kfz.251 series with the set specifically designed for the AFV Club 251 kits.
The set consists of 24 parts in light grey resin with just a bit of thin resin flash and the usual casting blocks to be removed before assembly with the set providing a replacement engine firewall, engine block and accessories plus the large front radiator, front chassis frames and for most of the basics for the engine and compartment.
Casting quality is good overall with no warping or other blemishes other than a couple of small air holes to contend with for easy cleanup.
The engine block is in one piece with separate top rocker cover and lower sump but the sides are a little uneven but this is not really noticeable on the assembled engine with the major engine accessories of exhaust manifold/air cleaner, alternator and the various fan belt pulleys provided as separate parts.
Items not provided which you will have to add yourself is the exhaust pipe and the plumbing pipes and wiring to finish off the engine and the Wings & Wheels Sd.Kfz.251 in detail book has many shots of the engine which will be very useful in building this set.
There are also a few items for the firewall such as the steering linkage, horn and other items.
Assembly of the engine and accessories is fairly straightforward with the instructions having three view photos of the assembled engine with the parts called out by number and there shouldn’t be any problems here even for those with basic resin working skills.
What the instructions don’t show you is how to fit the engine and radiator to the AFV Club kits and there is some quite extensive surgery needed to do this but you are left to your own devises and a fair bit if trial fitting is also needed.
The resin firewall is just a reproduction of the kit firewall with minor alterations on one side to fit the engine but this still includes the pin ejector marks of the kit part, you would think that at least these could have been removed before casting the parts but there are easy enough to remove.
The kit lower chassis includes the engine sump and this plus additional plastic has to be removed to fit the new engine but a few words of caution.
The resin radiator includes part of the mounting for the kit front suspension arm and you are supposed to use this to replace the kit mounting but the mounting bracket is not cast in the same position as the kit bracket making it very difficult to get the suspension arm mounting in the correct place and I found it easier to cut off the suspension mounting bracket from the radiator and use the kit suspension mounting.
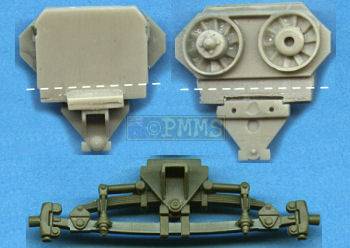
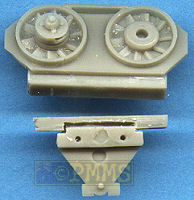
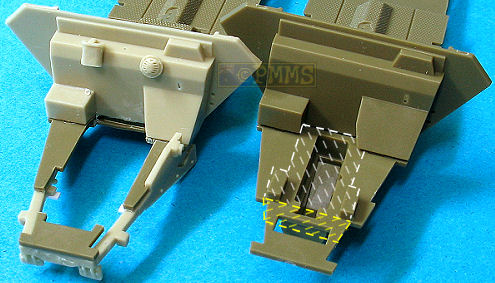
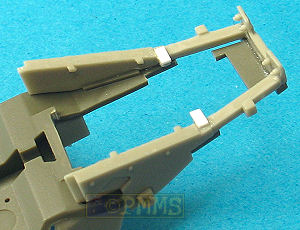
Removing the excess plastic requires some careful cutting to keep everything lined up correctly and I first glued with thick cyanoacrylate the resin chassis frames (part 3) to the kit chassis ensuring the front of the kit chassis was firmly glued in place.
All the excess plastic can now be cut away and as you cut away the front sections, shown in yellow on the images the front part of the kit chassis will remain in the correct position for adding the front suspension arm later.

After test fitting I also added two small plastic card tabs to act as engine mounting brackets as those included on the engine didn’t quite meet with the cast on brackets but some additional test fitting may be needed here to get the best fit.
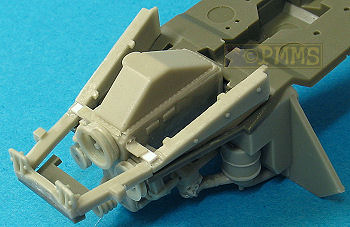
After removing all the plastic indicated and adding the card mounting brackets the assembled engine was quite a good fit but again test fitting often is needed to make any final adjustments.
Adding the modified resin radiator was simple enough but you must ensure it will clear the hull top when attached and again test fitting of the parts is essential before final gluing. I had a second partially assembled kit hull that was used to test fit the radiator and all that was needed was to angle to top of the radiator down towards the front to ensure it missed the hull top when fitted.
Another bit of trimming needed was to shorten the front locating tabs on the hull sides designed to fit into the square locating brackets on the kit chassis as these have been cut away to fit the engine but the sides still fit okay without these tabs.
To add the lower armoured sump cover will require some trimming of the cover to fit the new engine and again test fitting will determine what is required if you want to add this cover.
The kit front suspension arm is then attached to the remaining kit mounting ensuring it is in the correct position and the remainer of the kit can be assembled as per instructions and leaving the engine bay doors open will show off the resin engine.
As mentioned there is quite a bit of plumbing that can be added to the engine but all this will have to be provided from various thicknesses of wire or thin solder to finish off.
Conclusion:
The set provides all the basics for the HL 42 engine with the actual engine
assembly being quite straightforward but there is considerable work required
to fit the engine to the kit and some experience with conversions would be
helpful as no instruction is given to help here.
Recommended, 7/10 for the resin parts but 3/10 for the instructions.


 Sd.Kfz.251/1 in detail Special Museum Line No.37 Wings & Wheels Publications ISBN 80-86416-50-X |
 Sd.kfz.251 Panzer Tracts N0.15-2 ISBN 0-9771643-1-4 |
 SdKfz251 Ground Power Special GALILEO Publishing Co.,Ltd |
 Sd Kfz 251 Tank Power Vol.X Wydawnictwo Militaria No.224 ISBN: 83-7219-224-3 |
 Schutzenpanzer (Armored Personnel Carrier) Ryton Publications ISBN: 1930571291 |
Thanks to ![]() for
the review set.
for
the review set.
Page created January 17, 2007